About This Colourful Mini Dino Amigurumi Pattern
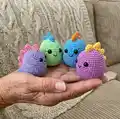
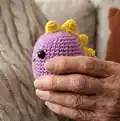
This pattern creates a small, colourful amigurumi dino worked in 8 ply (DK) cotton. The head and body are worked as one piece with a crocheted tail, and a row of spikes is sewn along the back for character. It includes step-by-step rounds, spike instructions and finishing notes to help you complete a neat little toy.

Perfect for using up yarn scraps or making a quick handmade gift, the dino finishes at about 7.5cm tall using the recommended yarn and hook. The pattern uses UK terminology and continuous rounds throughout.
Why You'll Love This Colourful Mini Dino Amigurumi Pattern
I absolutely love this pattern because it turns simple stitches into an irresistibly cute miniature dino in very little time. I enjoy how versatile the design is—you can change colours or scale the size by swapping yarn weight and hook. Sewing the spikes on with the small spike thread is a satisfying finishing touch that brings each dino to life. I also appreciate that the pattern is compact yet detailed, so you always know exactly what to do next.
Switch Things Up
I love to mix up the colour palette for these dinos — try pastel shades for a soft, nursery-friendly version or neon brights for a playful set.
You can make a keyring or bag charm by using thinner yarn and a smaller hook to create a tiny version; add a small metal ring when assembling.
For a chunkier, cuddlier version, use bulky yarn and a larger hook; this will increase the dino size and create a very tactile toy.
I often embroider different facial expressions to give each dino personality — try a surprised 'O' mouth, a cheeky grin, or closed sleepy eyes.
Try contrasting spike colours for a fun look or use a gradient yarn for the spikes to create a subtle ombre effect along the back.
I sometimes add safety joints or a bit of wire inside the tail if I want it to hold a pose — just be careful if the toy is for small children.
Create a mini family by varying yarn weights and colours so you have a collection of different sized dinos that look great displayed together.
Add accessories like a tiny crochet scarf, a little bow, or a felt crown to personalise each dino as a gift for special occasions.
If you want to change the shape, adjust increases in the head/body rounds to make a taller or squatter body, keeping the stitch count changes balanced.
I recommend testing a small sample swatch when changing yarn or hook sizes so you know how the adjustments affect final measurements before committing to a whole toy.
Common Mistakes & How to Fix Them
✗ Placing safety eyes too high or low can distort the face; follow the placement instruction and place eyes between rounds 9 and 10 (st 12 and st 18) for the correct look.
✗ Skipping stitch markers during continuous rounds often leads to mistaken counts; use a stitch marker at the start of each round to maintain accurate stitch totals and shaping.
✗ Stuffing too little or too much will change the shape of the dino; stuff gradually, shaping as you go and finish stuffing just before closing to avoid lumps or an overfilled body.
✗ Pulling your tension too tight on increases or decreases can tighten holes and distort shaping; maintain consistent, moderate tension and check stitch counts every few rounds.
✗ Sewing spikes without planning their spacing can make the back look uneven; lay out spikes along rounds 1 and 3 before sewing and use pins or removable stitch markers to align them evenly.