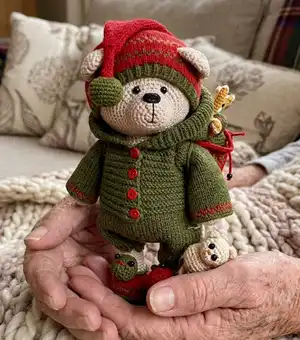
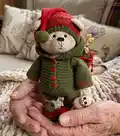
Create a charming handmade Christmas outfit and accessories for your amigurumi bear with this complete pattern. You will crochet a cozy coat, hat with pompom, boots, bag of gifts and tiny festive toys. The pattern includes step-by-step rounds, materials list and assembly tips so you can make a delightful holiday companion.
Progress Tracker
0% Complete
— Bag of gifts :
Info :
Work with the thread of red color.
Round 1 :
1round-inc into every stitch = 12
Round 2 :
2round-(1sc,1inc)*6 = 18
Round 3 :
3round- (2sc,1inc)*6 = 24
Round 4 :
4round- (3sc, 1inc)*6 = 30
Round 5 :
5round-(4sc,1inc)*6 = 36
Round 6 :
6round- (5sc,1inc)*6 = 42
Round 7 :
7round- (6sc,1inc)*6 = 48
Round 8 :
8round- (7sc,1inc)*6 = 54
Round 9 :
9round - (8sc ,1inc)*6 = 60
Round 10 :
10round-(9sc,1inc)*6 = 66
Round 11 :
11round-sc all across the round into back loops only = 66
Round 12-32 :
12-32rounds-sc all across the round = 66
Round 33 :
33round-Attach the thread of green color and crochet changing the threads -work one sc in red color, work the next sc in green color =66
Round 34 :
34round -sc all across the round (but now crochet one sc in green color, the next one in red color) = 66
Round 35 :
35round -dc all across the round (green color) = 66
Round 36-37 :
36-37rounds - crochet alternating red and green stitches = 66
Info :
Cut the thread of green color.
Round 38 :
38round-sc all across the round = 66
Infos :
Work with the thread of green color. Make a chain (straps, imitating arms)-ch40, attach to the rest loops of round 10, crochet around into front loops (we worked into back loops of stitches in this round before) - 66sc, ch40. Sew the chain-straps to the top part of the bag. Crochet a chain using a thread of red color and run this chain through the double crochet stitches in the round 35 using a needle.
— Christmas Tree :
Info :
Work with the thread of green color.
Round 1 :
1round-(1sc,1inc)*3=9
Round 2 :
2round-(2sc,1inc)*3=12
Round 3 :
3round-(3sc,1inc)*3=15
Round 4-6 :
4-6rounds-sc all across the round=15
Round 7 :
7round-(3sc,1dec)*3=12
Round 8 :
8round-(2sc,1dec)*3=9
Round 10 :
10round- (2sc,1inc)*6=24
Round 11 :
11round-(3sc,1inc)*6=30
Round 12-14 :
12-14rounds-sc all across the round=30
Round 15 :
15round-(3sc,1dec)*6=24
Round 16 :
16round-(2sc,1dec)*6=18
Round 17 :
17round-(1sc,1dec)*6=12
Round 18 :
18round-(1sc,1inc)*6=18
Round 19 :
19round-(2sc,1inc)*6=24
Round 20 :
20round-(3sc,1inc)*6=30
Round 21 :
21round-(4sc,1inc)*6=36
Round 22-24 :
22-24rounds-sc all across the round=36
Round 25 :
25round-(4sc,1dec)*6=30
Round 26 :
26round- crochet into back loops only (3sc,1dec)*6=24
Info :
Stuff the Christmas tree firmly.
Round 27 :
27round-(2sc,1dec)*6=18
Round 28 :
28round-(1sc,1dec)*6=12
Round 29 :
29round-dec all across the round and continue crocheting decreases until opening is closed.
Info :
The Christmas tree is finished. It can be decorated with ribbons, beads, buttons, pom-poms and etc.
— Monkey :
Info :
Work with the thread of beige color.
Round 1 :
1round-inc into every stitch = 12
Round 2 :
2round-(1sc,1inc)*6 = 18
Round 3 :
3round- (2sc,1inc)*6 = 24
Round 4-14 :
4-14rounds- sc all across the round = 24
Round 15 :
15round -(2sc,1dec)*6 = 18
Info :
Stuff with fiberfill.
Round 16 :
16round- (1sc,1dec)*6 = 12
Round 17 :
17round- dec all across the round and continue crocheting decreases until the opening is closed.
Info :
ears MR- 6sc. Cut the thread. Make the second ear in the same way.
Section :
muzzle MR -6sc 1round-inc into every stitch = 12 2round-(1sc,1inc)*6 = 18 Cut the thread, we will use it to sew the muzzle to the body. Insert or sew the eyes. Embroider a nose and a mouth. Sew the ears.
— Legs and arms :
Info :
Make ch10. Add a bead to the chain end if you want. And make 3pc more in the same way. Sew the arms and the legs. You can use a thread to make a tail and also add a bead to its end.
— Snowman :
Info :
Work with the thread of white color.
Round 1 :
1round-6inc = 12
Round 2 :
2round-(1sc,1inc)*6 = 18
Round 3 :
3round-(2sc,1inc)*6 = 24
Round 4-6 :
4-6rounds-sc all across the round =24
Round 7 :
7round -(2sc,1dec)*6 = 18
Round 8 :
8round -(1sc,1dec)*6 = 12
Round 9 :
9round - (1sc,1inc)*6 = 18
Round 10 :
10round- (2sc,1inc)*6 = 24
Round 11 :
11round- (3sc,1inc)*6 = 30
Round 12-14 :
12-14rounds-sc all across the round = 30
Round 15 :
15round -(3sc,1dec)*6 = 24
Round 16 :
16round -(2sc,1dec)*6 = 18
Round 17 :
17round -(1sc,1dec)*6 = 12
Round 18 :
18round -(1sc,1inc)*6 = 18
Round 19 :
19round -(2sc,1inc)*6 = 24
Round 20 :
20round-(3sc,1inc)*6 = 30
Round 21 :
21round -(4sc,1inc)*6 = 36
Round 22-23 :
22-23rounds-sc all across the round =36
Round 24 :
24round-(4sc,1dec)*6 = 30
Info :
Stuff with fiberfill.
Round 26 :
26round - (2sc,1dec)*6 = 18
Round 27 :
27round -dec all across the round and continue crocheting decreases until the opening is closed. Cut the thread.
Info :
Sew the eyes, button beads and a nose. Make two chains with ch7 in each one - they will be arms. Sew them to the sides. You can also add beads to the chain ends. Make a hat using a yarn of red color. MR-6sc 1round-6inc=12 2-5rounds -sc all across the round =12 6round -into front loops only -12sc 7round -sc all across the round Cut the thread and sew the hat to the snowman’s head.
— Gingerbread Men :
Info :
Work with the thread of beige or mustard color.
Round 1 :
1round-6inc = 12
Round 2 :
2round -(1sc,1inc)*6 = 18
Round 3 :
3round- (2sc, 1inc)*6 = 24
Round 4-6 :
4-6rounds-sc all across the round =24
Round 7 :
7round-(2sc,1dec)*6 = 18
Round 8 :
8round- (1sc, 1dec)*6 = 12
Round 9-10 :
9-10rounds -sc all across the round =12
Round 11 :
11round -(1sc,1inc)*6 = 18
Round 12 :
12round- sc all across the round =18
Round 13 :
13round -(2sc,1inc)*6 = 24
Round 14 :
14round - sc all across the round = 24
Round 15 :
15round -(3sc ,1inc)*6= 30
Round 16 :
16round -(4sc,1inc)*6 = 36
Round 17-25 :
17-25rounds -sc all across the round
Round 26 :
26round- 18sc Cut the thread. This will be a gingerbread girl. A gingerbread boy is crocheted in the same way. the difference is in the body pattern: 17-25rounds - sc all across the round =30
— CAP :
Info :
Work with the thread of green color. Make ch4. Start crocheting from the second ch, make a turning ch at the end of every row. Crochet into back loops only. 1-75rows -sc all across the row = 3 YOU MUST NECESSARILY TRY THE RIBBON ON THE BEAR’S HEAD. It should be freely put on the head. If it is not, then work a couple of rows more. Join, crochet through both ends. Change the thread color to red. Crochet along the ribbon, as if we were casting on loops. We should get 75 stitches. Crochet around.
Round 76 :
76 round- sl st all across the round = 75
Round 77 :
77round- 4sc, (1sc,1inc)*33, 5sc = 108
Round 78 :
78round -sc all across the row = 108
Round 79 :
79 round - crochet alternating one sc in green and one sc in red till the end of the round =108
Round 80 :
80round - one sc in red, one sc in green - repeat till the end of the round = 108
Round 81 :
81round-sc all across the round (in red color only) =108
Round 82 :
82round- 36sc, ch10, skip 10 stitches, 16sc, ch10, skip 10 stitches, 36sc = 108
Round 83 :
83round- sc all across the round = 108
Round 84 :
84round - crochet alternating green and red stitches = 108
Round 85 :
85round - one sc in red, one sc in green - repeat till the end of the round = 108
Info :
Cut the thread of green color.
Round 86-87 :
86-87rounds- sc all across the round = 108
Round 88 :
88round- (16sc ,1dec)* 6 = 102
Round 89 :
89round- sc all across the round = 102
Round 90 :
90round- (15sc,1dec)*6 = 96
Round 91 :
91round- sc all across the round = 96
Round 92 :
92round- (14sc,1dec)*6 = 90
Round 93 :
93round- sc all across the round = 90
Round 94 :
94round -(13sc,1dec)*6 = 84
Round 95 :
95round -(12sc,1dec)*6 = 78
Round 96 :
96round- (11sc, 1dec)*6 = 72
Round 97 :
97round- sc all across the round = 72
Round 98 :
98round -(10sc, 1dec)*6 = 66
Round 99 :
99round - sc all across the round = 66
Round 100 :
100round -(9sc, 1dec)*6 = 60
Round 101 :
101round -sc all across the round = 60
Round 102 :
102round - (8sc, 1dec)*6 = 54
Round 103 :
103round - sc all across the round = 54
Round 104 :
104round -(7sc, 1dec)*6 = 48
Round 105 :
105round -sc all across the round = 48
Round 106 :
106round -(6sc ,1dec)*6 = 42
Round 107 :
107round -sc all across the round = 42
Round 108 :
108round- (5sc ,1dec)*6 = 36
Round 109 :
109round-sc all across the round = 36
Round 110 :
110round -(4sc, 1dec)*6 = 30
Round 111 :
111round - sc all across the round = 30
Round 112 :
112round - (3sc , 1dec)*6 = 24
Round 113-124 :
113-124rounds -sc all across the round = 24
Round 125 :
125round - (2sc,1dec)*6 = 18
Round 126-133 :
126-133rounds- sc all across the round = 18
Round 134 :
134round - (1sc,1dec)*6 = 12
Round 135-142 :
135-142rounds-sc all across the round = 12
Round 143 :
143round- 6dec =6
Round 144-150 :
144-150rounds- sc all across the round =6
— POMPOM :
Info :
Work with the thread of green color.
Round 1 :
1round - 6inc = 12
Round 2 :
2round - (1sc , 1inc)*6 = 18
Round 3 :
3round - (2sc,1inc) *6 = 24
Round 4 :
4round - (3sc,1inc)*6 = 30
Round 5-7 :
5-7rounds- sc all across the round =30
Round 8 :
8round- (2sc,1dec)*7 ,2sc = 23
Round 9 :
9round- (1sc,1dec)*7, 2sc = 16
Info :
Stuff the pompom with fiberfill.
Round 10 :
10round - dec all across the round and continue making decreases until the opening is closed.
Info :
Cut the thread. Sew the pompom to the cap.
— Shoes - SOLE :
Info :
Work with the thread of green color. Make ch 11. Crochet along the chain, working around it. Make sl st and tch at the end of every round
Round 1 :
1round- start from the second ch - 1inc, 8sc, 4sc into one ch, 8sc, 1inc=24
Round 2 :
2round-1inc, 9sc, 4inc, 9sc, 1inc=30
Round 3 :
3round- 1inc, 12sc, 1inc , 2sc, 1inc, 12sc ,1inc=34
Round 4 :
4round-4sc, 1inc , (3sc, 1inc)*6, 4sc, 1inc=42
Round 5 :
5round-sc all across the round=42
Round 6 :
6round- 5sc, 1inc, (4sc,1inc)*6, 5sc, 1inc=50
Round 7 :
7round -sc all across the round =50
Info :
The sole should be necessarily put to the foot and it should be a bit larger. If your sole is not larger, then crochet one more round of sc. Turn the sole over and crochet across the wrong side of the piece into back loops only -sc all across the round=50
— Top part (shoe top) :
Info :
Work with the thread of red color. Attach the thread of red color. 8round-into front loops only (where we have crocheted with green thread into back loops only)-sc all across the round =50
Round 9 :
9round -sc all across the round = 50
Round 10 :
10round -one sc in green, one sc in red - repeat till the end of the round = 50
Round 11 :
11round-one sc in red, one sc in green - repeat till the end of the round = 50
Info :
Cut the thread of green color
Round 12 :
12round- sc all across the round =50
Round 13 :
13round- 15sc , 10dec , 15sc = 40
Round 14 :
14round- sc all across the round = 40
Round 15 :
15round- 19sc , 1dec , 19sc =39
Round 16 :
16round- sc all across the round=39
Info :
Cut the thread. Attach the thread of green color.
Round 17 :
17round- sl st all across the round= 39
Info :
Make the second shoe in the same way. Crochet the pom-poms in green or in red color in the same way.(find the pattern for pompom in the chapter CAP)-2pc and sew them to the top part of the shoe. If you want you can sew beads to pompoms for eyes and embroider the mouth.
— TOP PART (SHOE POM-POMS & DETAILS) :
Round 1-7 :
Make poms and sew. Follow CAP pompom instructions for details.
— OVERALL :
Info :
Work with the thread of green color (-yarn YarnART jeans N°82 (50g/160m)). Make ch46. Join and crochet in rounds.
Round 1 :
1round- sc all across the round =45
Round 2 :
2round -crochet into back loops only - 44sc, ch1, skip 1 stitch ( we need to make a small opening to insert a strap then.)
Round 3 :
3round- sc all across the round =45
Round 4 :
4round -fold across and crochet through both layers - sc all across the round =45
Round 5-9 :
5-9rounds- sc all across the round =45
Info :
The first leg is finished. Cut the thread. Crochet the second leg in the same way, but DON’T CUT the thread at the end. JOIN TWO LEGS. 10round-start from the second leg (as we have the thread there), ch7 , join the first leg, 45sc, 7sc along the chain , 45sc , 7sc along the chain =104.
Round 11-31 :
11-31 rounds -sc all across the round = 104
Info :
32round - crochet only 100sc Stop crocheting in rounds. Crochet in turning rows, make tch at the end of every row. 33row - sc all across the round, ch5 (for a buttonhole) =109 Make a buttonhole (make them in every sixth row- in rows 40, 46, 52, 57)
Round 34 :
34row- sc all across the round = 109
Round 35 :
35row- 105sc , ch3 , join the chain with single crochet = 109
Round 36 :
36row - sc all across the round =109
Round 37 :
37row- (8sc ,1dec)*10 , 9sc = 99
Round 38-39 :
38-39rows - sc all across the round = 99
Round 40 :
40row -1sc , ch3, skip 3 stitches, 95sc (make a buttonhole in this row)
Round 41 :
41row -(8sc ,1dec)* 9, 9sc = 90
Round 42-45 :
42-45rows - sc all across the round =90
Info :
Divide the stitches into three parts and crochet every part separately.
— RIGHT FRONT FOREPART :
Info :
Crochet in turning rows, make tch at the end of every row. DON’T FORGET TO MAKE BUTTONHOLES
Round 46-48 :
46-48rows- 21sc
Round 49 :
49row -1sc, 1dec , 18sc = 20
Round 50 :
50row - 17sc ,1dec ,1sc = 19
Round 51 :
51row - 1sc ,1dec, 16sc = 18
Round 52 :
52row - 15sc ,1dec ,1sc = 17
Round 53 :
53row - 1sc, 1dec, 14sc = 16
Round 54 :
54row -13sc, 1dec, 1sc = 15
Round 55 :
55row -1sc, 1dec, 12sc = 14
Round 56 :
56row -11sc, 1dec, 1sc = 13
Round 57 :
57row -1sc, 1dec, 10sc = 12
Info :
Don't cut the thread. Crochet along the armhole (where a sleeve will be located) -12 sl st and 9 sl st along the main fabric (row 45 ). We need to get to the back part without cutting the thread.
— BACK :
Info :
Crochet in turning rows, make tch at the end of every row.
Round 46-48 :
46-48rows - sc all across the round = 34
Round 49 :
49row- 1sc ,1dec , 28sc ,1dec ,1sc =32
Round 50 :
50row - 1sc ,1dec , 26sc ,1dec ,1sc =30
Round 51 :
51row -1sc ,1dec , 24sc ,1dec ,1sc =28
Round 52 :
52row -1sc ,1dec , 22sc ,1dec ,1sc =26
Round 53 :
53row- 1sc,1dec , 20sc ,1dec ,1sc =24
Round 54 :
54row-1sc ,1dec , 18sc ,1dec ,1sc =22
Round 55 :
55row-1sc ,1dec , 16sc ,1dec ,1sc =20
Round 56-57 :
56-57rows- sc all across the round = 20
Info :
Make ch5 at the end of the row and join THE RIGHT forepart with THE BACK PART.
This festive Christmas outfit set turns a simple amigurumi bear into a holiday adventurer, complete with a hat, coat, boots, bag of presents and tiny toys. The pattern includes dozens of clear rounds and stitch counts so everything fits perfectly. Make it for yourself or gift a handcrafted holiday companion this season. 🎄🧶✨