🧢 Beautiful ✨ Detailed πŸ’ Adorable

Christmas Bells Pattern

Christmas Bells Pattern
4.6β˜… Rating
2-3 Hours Time Needed
3.2K Made This
βœ‚οΈ

Intermediate Level

Ideal for those with basic crochet experience, featuring slightly more advanced stitches and techniques to expand your skills.

⏱️

Bite-Sized Project

Finishes in 2-4 hoursβ€”perfect for an afternoon of creative relaxation.

🏑

Cozy Accent

A warm touch for your space that transforms ordinary corners into inviting nooks filled with handmade charm.

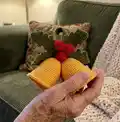
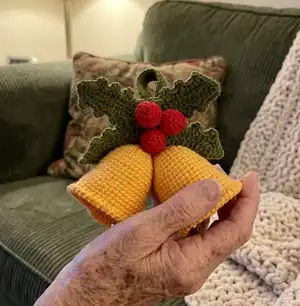
About This Christmas Bells Pattern

This pattern creates a festive pair of crochet bells decorated with holly leaves and berries, complete with a hanging loop. It includes step-by-step rounds for bells, leaves, berries, the bell language (clapper thread) and assembly instructions. Detailed photos and a crab (reverse) stitch edge help you achieve a neat finished look. Designed to be compact and decorative for holiday displays.

Christmas Bells Pattern crochet pattern - detailed view of completed project

You will work in continuous spirals for the bells and use a DK weight Yarn Art Jeans yarn as recommended. The instructions cover finishing touches like stuffing, tightening holes, and hiding threads for a professional result.

Why You'll Love This Christmas Bells Pattern

I absolutely love this pattern because it combines simple amigurumi-style shaping with decorative details that really pop at the holidays. I enjoy the way the crab (reverse) stitch gives the bell rim a tidy, finished edge that looks professional. The leaves and berries let you add color contrast and charm, and the finished piece is compact but very impactful in seasonal displays. Making multiple sets is quick and satisfying, so I often make a few to give as gifts or to hang on wreaths and garlands.

Christmas Bells Pattern step 1 - construction progress Christmas Bells Pattern step 2 - assembly progress Christmas Bells Pattern step 3 - details and accessories Christmas Bells Pattern step 4 - final assembly and finishing

Switch Things Up

I love to change colors to match my holiday decor; try metallic or variegated DK yarn for a festive twist.

I sometimes use a slightly smaller hook for a denser fabric if I want the bells to be sturdier and less prone to showing stuffing.

I like making mini versions by using thinner yarn and a smaller hook to create tiny keychain or ornament-sized bells.

Try embroidering veins on the leaves with a contrasting thread to add extra detail and texture.

You can replace the tambourine jingle with a small bead or leave the bell empty for a quieter decoration.

For a rustic look, use natural fiber yarns and add a twine bow between the bells.

I often add an extra row of crab stitch in a contrasting color to create a decorative rim around the bell edge.

Make a garland by stitching several bell units onto a long crocheted chain or ribbon for a cheerful display.

If you want posable leaves, add a small piece of craft wire inside the leaf before closing and shape gently.

To make the piece more giftable, attach a small crocheted gift tag or loop a ribbon through the top loop before packaging.

Common Mistakes & How to Fix Them

βœ— Crocheting too loosely which causes stuffing to peek through the stitches; use a slightly smaller hook or tighten your tension to close gaps before stuffing. βœ— Forgetting to stuff gradually which leads to lumpy shapes; add small amounts of fiberfill while shaping to keep a smooth, even curve. βœ— Not securing the tambourine (jingle bell) thread properly can make the clapper fall out; tie and knot the thread securely, then hide and sew the tail inside the bell. βœ— Skipping the crab (reverse) stitch row will make the bell edge look unfinished; follow the instruction exactly and practice the reverse single crochet on a scrap before applying it to the bell. βœ— Failing to hide and tie threads from leaves/loop can create a messy back; use a needle to pull threads to the back and sew them together neatly before finishing.

Christmas Bells Pattern

Make cheerful crochet Christmas bells to decorate your home or give as handmade gifts. This pattern guides you through making two bells, leafy sprigs and sweet little berries with clear step-by-step instructions and photos. You will learn a crab (reverse) stitch edge, make a stitched loop and assemble all parts into a charming hanging decoration. Perfect for holiday dΓ©cor and thoughtful handmade presents.

Intermediate 2-3 Hours

Materials Needed for Christmas Bells Pattern

β€” Main Fabric

  • 01
    DK weight yarn - Yarn Art Jeans (55% cotton/45% acrylic; 50 g/160 m)
  • 02
    Yarn Art Jeans No. 35 (yellow) - bells (listed in materials)
  • 03
    YarnArt Jeans No. 03 (yellow) - bells (alternative reference in rounds)
  • 04
    Yarn Art Jeans No. 82 (dark green) - leaves, loop
  • 05
    Yarn Art Jeans No. 90 (red) - berries
  • 06
    Small amounts of contrasting yarn for bell language and finishing

β€” Tools Required

  • 01
    Crochet hook size 2.25 mm
  • 02
    Smaller crochet hook for pulling thread into bell eye (for bell language)
  • 03
    Tapestry needle / yarn needle for sewing and tightening holes
  • 04
    Scissors
  • 05
    Stitch marker (a scrap of contrasting yarn)
  • 06
    Stuffing material (fiberfill / polyester)
  • 07
    Tambourine / jingle bells - 2 pieces
  • 08
    Needle for connecting loop ends and sewing pieces together

Progress Tracker

0% Complete

β€” Notes :

Info :

NOTE! Yarn consumption, size, and appearance of the toy depend on crochet density and how you hold the yarn. The presented toy is crocheted with V and X look single crochet: (First, you grab yarn over the hook, and for making the second stitch grab it under the hook). The finished product using the materials specified in this template has a size of ~4.7*5.1 inches with a loop. Make sure you crochet tight enough; otherwise, the stuffing will show through the holes. Crochet the toy in continuous spirals without turning chains.

β€” Bells :

Yarn :

Yarn - YarnArt Jeans No. 03 (yellow)

Rnd 1 :

6 into MR

Rnd 2 :

6 inc (12)

Rnd 3 :

(1 sc, inc)*6 (18)

Rnd 4 :

(2 sc, inc)*6 (24)

Rnd 5 :

(3 sc, inc)*6 (30)

Rnd 6-7 :

30 sc (2 rounds)

Rnd 8 :

(4 sc, inc)*6 (36)

Rnd 9-14 :

36 sc (6 rounds)

Rnd 15 :

(5 sc, inc)*6 (42)

Rnd 16-19 :

42 sc (4 rounds)

Info :

* Crochet the next row with Crab (Reverse) stitch

Rnd 20 :

42 sc (Crab stitch), 1 sl st

Info :

Break yarn. Pull tightly. Hide the tail inside.

β€” Bell language :

Info :

Chain 16 with blue yarn. Using a smaller hook, pull the thread into the eye of the bell to grab and pull the thread.

Info :

Start working in the second chain from hook 15 sc. Break yarn.

Info :

We attach the finished language to the bell. Tie all the threads. Tie both bells together.

β€” Leaf :

Yarn :

Yarn - YarnArt Jeans No. 82 (dark green)

Rnd 1 :

Chain 15, crochet to the chain foundation. Start working in the second chain from hook - 13 sc, 3 sc in 1 stitch.

Info :

Continue crocheting on the other side of the chain foundation. – 12 sc, 3 sc in 1 stitch.

Rnd 2 :

(3 sc, chain 3, 1 sc in the previous stitch)*4, 3 sc, chain 3, 1 sc in the previous stitch, (3 sc, chain 3, 1 sc in the previous stitch)*4, 2 sc, 2 sl st.

Info :

Break yarn, leaving a long tail for sewing.

Info :

* Iron the part with steam if it is uneven. To do this, put a damp cloth on top of a crochet garment and steam it off for a few seconds.

β€” Berries :

Yarn :

Yarn - YarnArt Jeans No. 90 (red)

Rnd 1 :

6 into MR

Rnd 2 :

6 inc (12)

Rnd 3-6 :

12 sc (4 rounds)

Info :

Complete stuffing with fiberfill.

Info :

Tighten the hole using a tapestry needle.

β€” Assembly :

Step 1 :

Sew four leaves together.

Step 2 :

Using a needle, remove all the threads from the bell to the back of the sheet and tie them together.

Step 3 :

Sew the berries to the center of the leaf cluster.

Step 4 :

Attach the finished language (clapper thread) to the bell and tie all the threads securely.

Step 5 :

Tie both bells together and hide all protruding threads by sewing them to the back of the leaves.

β€” Loop :

Yarn :

Yarn - YarnArt Jeans No. 82 (dark green)

Rnd 1 :

Chain 41, turn and continue crocheting on the other side of the chain.

Rnd 2 :

40 sc, 1 cp, turn

Rnd 3 :

40 sc

Info :

Cut off the long end of the thread. Use a needle to connect the ends. With the remaining piece of thread, sew the loop to the back of the leaves, thereby hiding all the protruding threads.

Assembly Instructions

  • Sew four leaves together into a star arrangement and secure with several stitches at the center.
  • Using a needle, remove all finishing threads from the bells to the back of the leaf sheet and tie them together to secure the bells to the leaf base.
  • Attach the bell language (clapper thread) through the eye of each tambourine and tie securely, then hide the tails inside the bell.
  • Position and sew the three berries to the center of the leaf cluster, covering the connection point of the bells and hiding knots.
  • Sew the crocheted loop to the back of the leaves using the remaining thread, hiding all protruding ends for a neat finish.

Important Notes

  • πŸ’‘Make sure you crochet tight enough around the bells to prevent stuffing from showing through the stitches.
  • πŸ’‘Stuff the berries and bells gradually and evenly to maintain smooth shapes and avoid lumps.
  • πŸ’‘Use a tapestry needle to tighten holes and to hide and tie the threads securely for a clean finish.
  • πŸ’‘Pin parts together and check placement before sewing to ensure symmetry and the best final look.
  • πŸ’‘Press leaf pieces with steam if they are uneven, using a damp cloth and a few seconds of steam.

This cheerful Christmas bells pattern makes a lovely, handmade addition to your holiday decor. It combines simple shaping with pretty finishing touches and is perfect for gifting or decorating your home. Make a few in different colors and hang them on wreaths, mantels, or as stocking embellishments. πŸ§ΆπŸŽ„

You ask,

we answer.

FAQs

What size will the finished piece be?

The finished decoration measures approximately 4.7 x 5.1 inches with the loop when made with the recommended yarn and hook size.

Can I use different yarn weights for this pattern?

Yes, you can use different yarn weights but this will affect the final size; choose an appropriate hook size for the yarn and expect changes in scale.

Do I need prior crochet experience for this pattern?

This pattern is rated intermediate, so basic knowledge of single crochet, increases/decreases and working in rounds is recommended for best results.

How long does this project typically take to complete?

Most crocheters complete this project in 2-3 hours, though time will vary depending on experience level and how many sets you make.

How do I attach the jingle bells securely inside the crocheted bells?

Use a small length of yarn or thread pulled through the eye of the tambourine, knot it securely and hide the tail inside the bell, then add a few stitches to anchor it in place.