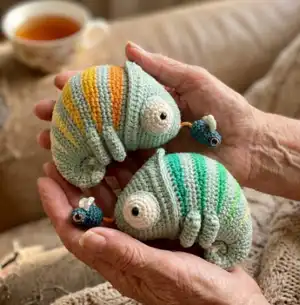
Create a charming musical chameleon with this detailed crochet pattern. You will make a cuddly, striped chameleon with a pull-string music box and a tiny fly, using clear step-by-step rounds and photo tutorials. The pattern includes color options, full materials and abbreviations, and careful assembly notes so you can complete a unique toy to keep or gift. Perfect for crocheters who enjoy shaping, colorwork and small assembly details.
Progress Tracker
0% Complete
— Head :
Round 01 :
sc 6 into the magic loop (6)
Round 03 :
[°sc 3°, sc 3] 3x (18)
Round 04 :
sc 1, °sc 3°, sc 5, °sc 3°, sc 5, °sc 3°, sc 4 (24)
Round 05 :
sc 10, °sc 3°, sc 13 (26)
Round 06 :
sc 2, °sc 3°, sc 8, °sc 3°, sc 8, °sc 3°, sc 5 (32)
Round 07 :
sc 14, °sc 3°, sc 17 (34)
Round 08 :
sc 3, °sc 3°, sc 11, °sc 3°, sc 11, °sc 3°, sc 6 (40)
Round 09 :
sc 18, °sc 3°, sc 21 (42)
Round 10 :
sc 19, °sc 3°, sc 22 (44)
Round 11 :
sc 20, °sc 3°, sc 23 (46)
Round 13 :
sc 21, [inc] 2x, sc 23 (48)
Round 15 :
sc-blo 23, inc-blo, sc-blo 24 (49)
Round 17 :
sc 23, inc, sc 1, inc, sc 23 (51)
Round 18 :
sc 51 (→ photos 01+02) (51)
Info :
Take the main color loop off the hook and safe it on a stitch marker. Starting in the first stitch of the rnd count 7 stitches forward (→ photo 03).
Round 19 :
(short row) Join color B (orange) with a slip knot (→ Tutorial D) into the 7th stitch (→ photos 04+05), sc 1 into the next stitch (→ photo 06), sc 35, slst 1, cut the yarn and close the row invisibly (→ Tutorial F).
Round 20 :
(short row) Join color B with a slip knot into the 5th stitch of the previous orange row (→ photo 07), sc 27, slst 1, cut the yarn close the row invisibly.
Round 21 :
(short row) Join color B with a slip knot into the 5th stitch of the previous orange row (→ photo 08), sc 18, slst 1, cut the yarn and close the row invisibly.
Info :
Pick up the main color loop.
Round 22 :
sc 6, sc 1 in same stitch as slip knot join (→ photos 10+11), sc 4, sc 1 in same st like slip knot join of 2nd orange row, sc 4, sc 1 in same st like slip knot join of 3rd orange row, sc 19. You've reached the first closing stitch of a short row now. Insert the hook into both front loops, the one of the original stitch and the front loop of the sewn closing stitch above the original stitch (→ photos 13+14) and sc-flo 1 into the closing stitch. Work into both front loops only for every closing stitch of a short row here and throughout. sc 14. (51)
Rounds 23-24 :
(2 rnds) sc 51
Info :
Take the main color loop off the hook and safe it on a stitch marker. Starting in the first stitch of the rnd count 8 stitches forward.
Round 25 :
(short row) Join color C (yellow 1) with a slip knot into the 8th stitch (→ photo 19), sc 36, slst 1, cut the yarn, close row invisibly (→ Tutorial F).
Round 26 :
(short row) Join color C with a slip knot into the 5th stitch of the previous yellow row, sc 27, slst 1, cut the yarn and close the row invisibly.
Round 27 :
(short row) Join color C with a slip knot into the 5th stitch of the previous yellow row, sc 18, slst 1, cut the yarn and close the row invisibly.
Info :
Pick up the main color loop.
Round 28 :
sc 7, sc 1 in same stitch as slip knot join, sc 4, sc 1 in same st like slip knot join of 2nd yellow row, sc 4, sc 1 in same st like slip knot join of 3rd yellow row, sc 33 (51)
Rounds 29-30 :
(2 rnds) sc 51
Info :
Take the main color loop off the hook and safe it on a stitch marker. Now, take a short break fit in the music box insert and stuff the body.
— Music box insert :
Info :
Put the music box into the head. Use the crochet hook to draw the pull cord of the music box through the center of the magic loop (→ photos 20+21). On the outside, fasten the cord with a safety pin, stitch marker, or knot to stop it from slipping back inside the head. Next, stuff the space in front of the music box well (→ photo 22)! Make sure the tip of the head is stuffed well enough to hold the music box back, when you pull the cord to make it play. Inside the body, place the music box with its top side turned towards the bottom of the body (→ photo 23), so that the cord stands in a straight line from where it comes out of the music box to the center of the magic loop. Now, stuff the space all around the music box very well. Make sure to stuff well enough, so that the music box can’t move much inside the body and you won’t feel its corners when you squeeze or snuggle the chameleon (→ photo 24). From now on, continue to stuff the body well as you go.
Round 31 :
(short row) Join color D (yellow 2) with a slip knot into the 9th stitch, sc 36, slst 1, cut the yarn and close the row invisibly (→ Tutorial F). (49)
Round 32 :
(short row) Join color D with a slip knot into the 5th stitch of the previous yellow row, sc 27, slst 1, cut the yarn and close the row invisibly.
Round 33 :
(short row) Join color D with a slip knot into the 5th stitch of the previous yellow row, sc 7, [dec] 2x, sc 7, slst 1, cut the yarn and close the row invisibly. (49)
Info :
Pick up the main color loop.
Round 34 :
sc 8, sc 1 in same stitch as slip knot join, sc 4, sc 1 in same st like slip knot join of 2nd yellow row, sc 4, sc 1 in same st like slip knot join of 3rd yellow row, sc 7, dec, sc 21 (48)
Round 35 :
sc 24, dec, sc 1, dec, sc 19 (46)
Round 36 :
sc 25, dec, sc 19 (→ photo 25) (45)
Info :
Take the main color loop off the hook and safe it on a stitch marker. Starting in the first stitch of the rnd count 10 stitches forward.
Round 37 :
(short row) Join color E (yellow 3) with a slip knot into the 10th stitch, sc 13, dec, sc 1, dec, sc 12, slst 1, cut the yarn and close the row invisibly (→ Tutorial F). (43)
Round 38 :
(short row) Join color E with a slip knot into the 5th stitch of the previous yellow row, sc 9, dec, sc 8, slst 1, cut the yarn and close the row invisibly. (42)
Round 39 :
(short row) Join color E with a slip knot into the 5th stitch of the previous yellow row, sc 2, dec, sc 1, dec, sc 2, slst 1, cut the yarn and close the row invisibly. (40)
Info :
Pick up the main color loop.
Round 40 :
sc 1, [dec] 2x, sc 4, sc 1 in same stitch as slip knot join, sc 4, sc 1 in same st like slip knot join of 2nd yellow row, sc 4, sc 1 in same st like slip knot join of 3rd yellow row, sc 2, dec, sc 16 (37)
Round 41 :
sc 18, dec, sc 1, dec, sc 14 (35)
Round 42 :
sc 1, dec, sc 15, dec, sc 15 (→ photos 26-28) (33)
Info :
Take the main color loop off the hook and safe it on a stitch marker. Starting in the first stitch of the rnd count 8 stitches forward.
Round 43 :
(short row) Join color F (yellow 4) with a slip knot into the 8th stitch, sc 8, dec, sc 1, dec, sc 8, slst 1, cut the yarn and close the row invisibly (→ Tutorial F). (31)
Round 44 :
(short row) Join color F with a slip knot into the 3rd stitch of the previous yellow row, sc 6, dec, sc 6, slst 1, cut the yarn and close the row invisibly. (30)
Round 45 :
(short row) Join color F with a slip knot into the 3rd stitch of the previous yellow row, sc 2, [dec] 2x, sc 2, slst 1, cut the yarn and close the row invisibly. (28)
Info :
Pick up the main color loop.
Round 46 :
sc 7, sc 1 in same stitch as slip knot join, sc 2, sc 1 in same st like slip knot join of 2nd yellow row, sc 2, sc 1 in same st like slip knot join of 3rd yellow row, sc 1, dec, sc 11 (27)
Note :
TIP: You’ll work slip stitches in rnd 47 and throughout.
Round 47 :
sc 1, inc, sc 11, dec, sc 1, dec, sc 6, slst 3 (26)
Round 48 :
slst 8, sc 7, dec, sc 9 (→ photo 29) (25)
Info :
Take the main color loop off the hook and safe it on a stitch marker. Starting in the first stitch of the rnd count 9 stitches forward.
Round 49 :
(short row) Join color G/G1 (white/violet) with a slip knot into the 9th stitch, sc 4, dec, sc 1, dec, sc 4, slst 1, cut the yarn and close the row invisibly (→ Tutorial F). (23)
Round 50 :
(short row) Join color G/G1 with a slip knot into the 3rd stitch of the previous white row, sc 1, [dec] 2x, sc 1, slst 1, cut the yarn and close the row invisibly. (21)
Info :
Pick up the main color loop.
Round 51 :
sc 3, inc, sc 4, sc 1 in same stitch as slip knot join, sc 2, sc 1 in same st like slip knot join of 2nd white row, sc 1, dec, sc 6 (21)
Round 52 :
slst 8, sc 4, [dec] 2x, sc 5
Round 53 :
sc 4, inc, sc 7, dec, sc 5 (→ photo 30) (19)
Info :
Remove marker, sc 1, slst 1.
Round 54 :
(short row) Join color G (white) with a slip knot into the 8th stitch, sc 2, [dec] 2x, sc 2, slst 1, cut the yarn and close the row invisibly (→ Tutorial F). (17)
Round 55 :
(short row) Join color G with a slip knot into the 2nd stitch of the previous white row, sc 1, dec, slst 1, cut the yarn and close the row invisibly. (16)
Info :
Pick up the main color loop.
Round 56 :
slst 7 (pm in 1st slst = new beginning of following rnds), sc 1 in same stitch as slip knot join, sc 1, sc 1 in same st like slip knot join of 2nd white row, dec, sc 4 (15)
Round 57 :
sc 3, inc, sc 5, dec, sc 4
Round 58 :
sc 1, slst 6, sc 3, dec, sc 3 (→ photo 31) (14)
Info :
Remove marker, sc 3.
Round 59 :
(short row) Join color G (white) with a slip knot into the 5th stitch, sc 2, dec, sc 2, slst 1, cut the yarn and close the row invisibly (→ Tutorial F). (13)
Round 60 :
(short row) Join color G with a slip knot into the 1st stitch of the previous white row, sc 1, dec, slst 1, cut the yarn and close the row invisibly. (12)
Info :
Pick up the main color loop.
Round 61 :
sc 1, (pm = new beginning of following rnds), inc, sc 2, sc 1 in same stitch as slip knot join, sc 1 in same st like slip knot join of 2nd white row, dec, sc 3, slst 1 (12)
Round 62 :
slst 5, sc 2, dec, sc 3 (11)
Round 63 :
sc 2, inc, sc 4, dec, sc 2
Info :
Remove marker, sc 1, slst 1.
Round 64 :
change to color G (white) (→ Tutorial B), slst 3 (pm in 1st slst = new beginning of following rnds), sc 3, dec, sc 3 (10)
Round 65 :
sc 1, inc, sc 3, dec, sc 3
Round 66 :
slst 1, change to main color, slst 2, sc 2, dec, sc 3
Round 67 :
sc 1, inc, sc 3, dec, sc 2
Round 68 :
sc 1, slst 3, sc 1, dec, sc 2 (8)
Round 69 :
sc 2, change to color G, inc, sc 2, dec, sc 1
Round 70 :
slst 3 (pm in 1st slst = new beginning of following rnds), sc 1, dec, sc 2 (7)
Round 71 :
sc 1, change to main color and cut yarn G, inc, sc 1, dec, sc 2 (6)
Round 72 :
sc 1, slst 3, sc 1, dec (6)
Info :
Remove marker, sc 2.
Round 73 :
sc 1 (pm = new beginning of following rnds), sc 2, dec, sc 1 (5)
Rounds 74-75 :
(2 rnds) sc 5 (→ photo 33)
Info :
Cut the yarn, leaving a very long tail and close the last rnd invisibly (→ Tutorial F). Thread a yarn needle with the main color yarn tail. Starting at the tip of the tail, roll up the chameleon tail as shown in photos 34+35. Fasten the curled up tail with a sewing stitch every second, or third row. When the tail is all curled up, sew in the ends. (→ photo 36)
— Head Shield :
Round 01 :
Holding the body head down, join main color with a standing sc (→ Tutorial E) into the first remaining front loop of rnd 15 (→ photo 37), sc 21, inc, sc 1, inc, sc 22, inc (51)
Round 02 :
slst 1, sc 7, hdc 8, dc 6, [dc-inc] 3x, dc 6, hdc 8, sc 10, dec (53)
Round 03 :
sc 25, inc, sc 27 (54)
Info :
Cut the yarn and close the rnd invisibly (→ Tutorial F). (→ photos 38+39)
— Eyes MAKE 2 :
Info :
Using color G (white), make a magic loop.
Round 01 :
sc 7 into a magic loop (7)
Rounds 03-05 :
(2 rnds) sc 21
Info :
Slst 1 into the next stitch, cut the yarn with a very long rest and close the rnd invisibly (→ Tutorial F). Attach a black safety eye in the center of the magic loop. Make another eye the same way. Pin the eyes in position as shown in → photos 40+41, between the bottom of rnd 06 and the top of rnd 13. Use the white yarn tail to sew the back loops of the stitches of the last round of the eye onto the body (→ photos 42-45). Before closing the last few stitches, put a little bit of soft stuffing into the eye – just enough to keep the shape. Then, finish the last stitches and weave in the ends. A round of white front loops will remain at the margin of the eye. With a long strap of main color (sage) yarn sew a border around each eye. Therefore, sew around each front loop 3 times (→ photo 47) – repeat all the way around the eye. Take care to sew rather loosely and place the stitches evenly next to another!
— Legs MAKE 4 :
Piece A (using main color sage) :
make a magic loop. Round 01: sc 6 into a magic loop (6). Rounds 02-03: (2 rnds) sc 6. Slst 1 into the next stitch, cut the yarn and close rnd invisibly (→ Tutorial F).
Piece B :
Repeat instructions as given for piece A until the end of rnd 03. Don’t cut the yarn this time, but hold piece A next to the hook.
Round 04 :
On piece A, sc 1 into the next stitch after the closing stitch (→ photo 48 / pm = 1st stitch), sc 4, skip the closing stitch on piece A and one stitch on piece B (→ photo 49), then sc 5 along piece B. (10)
Round 06 :
sc 1, sc3tog, sc 6 (8)
Round 07 :
sc3tog, sc 5 (6)
Info :
Close the open end flat with a row of sc stitches: Fold, so that 2 stitches line each other in 2 layers (→ photo 50). Go through both layers at once: sc 2. Cut the yarn with a long rest to sew the leg onto the body. Make another 3 legs the same way. Pin the legs into place (refer to → photo 52 for the right position). Use the yarn tails to sew the legs onto the body (→ photos 52). Then, weave in all ends.
— FLY :
Info :
Using color H (petrol), make a magic loop.
Round 01 :
sc 6 into a magic loop (6)
Info :
Take a break to attach the fly to the pull string of the music box. Pay attention that the pull string of the music box is completely wound up and the music stopped to play! Draw the end of the pull string through the center of the magic ring and place the fly next to the tip of the snout of the chameleon – with a distance of 2-3 cm (approx. 1 inch) between the fly and the tip of the snout (→ photo 53). Knot the end of the pull string near to the surface inside the body of the fly (→ photo 53). Make sure the knot is big and fastened enough, so that it can’t slip back through the center of the magic loop when you pull the fly later to make the music box play!
Rounds 04-05 :
(2 rnds) sc 12 (12)
Round 06 :
[sc 1, dec] 4x, stuff the body (→ photo 54) (8)
Round 07 :
[inc-flo, sc-flo 1] 4x (12)
Info :
Attach the colored safety eyes (Ø10mm) between rnds 08 and 09 (→ photo 55). The shanks of the eyes could be a bit too long to fit into the head, so you might need to cut off the end once the washer is placed on the shank. The best way to shorten the shank is to melt the plastic shank with a lighter and press it flat (→ photos 57-59). TIP: Alternatively you can use yarn in a color of your choice to embroider the eyes. Now, stuff the head, cut the yarn, close the last rnd through the front loops (→ Tutorial G) and weave in the end. (→ photos 60-62)
— WINGS MAKE 2 :
Info :
Using color G (white) make a foundation chain of 4 ch. Start in the second ch from hook and crochet along the chain: slst 1, sc 1, sc 4 into the last stitch. Next, along the other side of the chain: sc 1, slst 1, slst 1 into the first stitch of the rnd, ch 1. Cut the yarn with a long rest (→ photo 63). Then, make another wing the same way. Using the yarn tails, sew the wings onto the body – on the neck of the fly between rnds 06 and 07 (→ photo 64+65).
Assembly Instructions
- Insert the mechanical pull-string music box through the magic loop of the head and secure the pull string on the outside with a stitch marker or safety pin so it cannot slip back inside.
- Stuff the body and around the music box very firmly so the box cannot move; place the music box with its top side turned towards the bottom of the body so the cord runs straight from the box to the magic loop.
- Pin eyes between the bottom of rnd 06 and the top of rnd 13 and sew the back loops of the eye’s last round to the body; add a white front loop border by sewing around the front loops 3 times.
- Sew legs into place using yarn tails and pinning for symmetry; attach 4 legs evenly spaced under the body for stability.
- Attach the fly to the pull-string and knot securely near the inside surface of the fly so it cannot pull through the magic loop.
- Sew the head shield onto the front of the head aligning the front loops as indicated and sew the remaining parts securely; weave in all yarn ends before finishing.
Important Notes
- 💡Use stitch markers to keep track of rounds and the start of short rows, especially when working color changes and closing stitches.
- 💡Stuff firmly and evenly around the music box and in the head so the music box sits securely and the head keeps shape.
- 💡Work with consistent tight tension and use the recommended 3.5 mm hook to prevent gaps where the music box or stuffing could show.
- 💡When using safety eyes, shorten and flatten the shank if necessary and fasten washers securely; consider embroidery for toys intended for children under 3.
- 💡Pin pieces in place before sewing to ensure correct placement and symmetry; sew rather loosely when adding the decorative border around eyes to keep the stitches even.
Conrad the chameleon is a playful, musical amigurumi full of personality and handmade charm. Make one as a special gift or a unique piece for your home — the tiny fly and pull-string music box are delightful finishing touches. Follow the pattern step-by-step to create a durable, beautifully shaped toy that will bring smiles. 🧶✨
What size will the finished piece be?
If made from the recommended yarn and hook, the chameleon measures approx. 17 cm (6.7 inch) in length and approx. 15 cm (6 inch) in height.
Can I use different yarn weights for this pattern?
Yes, you can use different yarn weights, but this will affect the final size and the fit of the music box; choose an appropriate hook for the yarn and expect size changes.
Do I need prior crochet experience for this pattern?
This pattern is rated intermediate; basic knowledge of single crochet, increases, decreases, and experience with short rows and front/back loop work is recommended.
How long does this project typically take to complete?
Most crocheters complete this project in 8-10 hours, depending on experience, color changes and assembly time.
Stay in the Loop!
Get notified when we release new free crochet patterns and join our crafting community!