🧢 Beautiful ✨ Detailed πŸ’ Adorable

Canadian Maple Leaf Amigurumi Pattern

Canadian Maple Leaf Amigurumi Pattern
4.7β˜… Rating
2-4 Hours Time Needed
2.6K Made This
βœ‚οΈ

Intermediate Level

Ideal for those with basic crochet experience, featuring slightly more advanced stitches and techniques to expand your skills.

⏱️

Bite-Sized Project

Finishes in 2-4 hoursβ€”perfect for an afternoon of creative relaxation.

🍁

Charming Critter

Delightful animal designs with sweet details that capture the essence of your favorite woodland and farmyard friends.

About This Canadian Maple Leaf Amigurumi Pattern

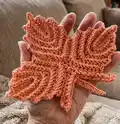
This pattern creates a detailed Canadian maple leaf coaster or applique9 using worsted weight yarn and a 4.5 mm hook. The design is made from three identical small leaves joined together with a central stalk for a realistic look. Instructions include row-by-row directions, special stitches, diagrams, assembly steps, and optional wet-blocking tips.

Canadian Maple Leaf Amigurumi Pattern crochet pattern - detailed view of completed project

Perfect for gifting or seasonal decor, this pattern highlights texture through front and back post single crochet techniques. Clear photos and diagrams help you place markers and join pieces precisely.

Why You'll Love This Canadian Maple Leaf Amigurumi Pattern

I absolutely love this pattern because it combines simple stitches into an elegant, textured leaf that almost looks like knit work. I enjoy how the front and back post single crochets add depth and definition with very little extra effort. I also appreciate that it can be used as a coaster, applique9, or seasonal decoration, making it versatile and gift-ready. The assembly is satisfying mdash; watching three small leaves become a single, sculpted maple leaf always feels rewarding.

Canadian Maple Leaf Amigurumi Pattern step 1 - construction progress Canadian Maple Leaf Amigurumi Pattern step 2 - assembly progress Canadian Maple Leaf Amigurumi Pattern step 3 - details and accessories Canadian Maple Leaf Amigurumi Pattern step 4 - final assembly and finishing

Switch Things Up

I love customizing this leaf by changing colors; try autumn shades like russet, gold, and olive for a fall collection.

To make a mini version, I use sport or DK weight yarn and a smaller hook; the proportions stay the same and the leaf becomes a lovely ornament or keychain.

I sometimes add a little embroidery vein on the right side to accentuate the leaf ribs; a contrasting thread works nicely for subtle detail.

If I want a sturdier coaster, I add a second identical leaf and whip stitch them together around the edges, leaving a small gap to insert thin cork before closing.

For a softer look I substitute a fuzzy or boucle yarn and block gently to maintain the texture without flattening the pile.

I also experiment with metallic or variegated yarns for festive decor; they make quick, eye-catching table accents.

Try adding a loop to the stalk end to hang the leaf as an ornament or garland component.

If you prefer a flatter leaf, reduce the 5-sc increase points to 3 sc in that spot to minimize cupping at the tips.

I often combine different stitch heights in the stalk to create a tapered effect; play with sc and hdc sequences to taste.

Finally, I recommend practicing fpsc and bpsc on a small swatch to get comfortable with the textures before starting the leaf; it makes the rest of the pattern more enjoyable.

Common Mistakes & How to Fix Them

βœ— Skipping the foundation chain bottom when working Row 1 will change stitch counts and disrupt the leaf shape; work across the bottom of the foundation chain as instructed to reach the correct 19 stitches. βœ— Not placing or keeping the center marker will make alignment of the three small leaves difficult during assembly; place a marker at the center and keep the middle marker until the leaves are whip stitched together. βœ— Forgetting to count stitches after increases like 5 sc in a stitch can cause uneven sides; recount after each row and correct immediately to maintain symmetry. βœ— Pulling tension too tight on post stitches will warp the texture and curl the leaf edges; use consistent, moderate tension and practice fpsc/bpsc on a swatch first to match gauge.

Canadian Maple Leaf Amigurumi Pattern

Make a charming Canadian maple leaf coaster or applique9 with this detailed intermediate crochet pattern. Youll create three textured small leaves, assemble them with a stalk, and finish with optional wet blocking for a crisp, professional look. The pattern includes diagrams, step-by-step row instructions, special stitch notes, and assembly photos to guide you all the way.

Intermediate 2-4 Hours

Materials Needed for Canadian Maple Leaf Amigurumi Pattern

β€” Main Fabric

  • 01
    Worsted weight yarn (Medium / 4) - Red Heart Super Saver or any similar worsted weight yarn (quantity: small amount, approx 25-50g depending on number of leaves desired)
  • 02
    Contrast or multiple colors optional - 25-50g each for multiple leaves or sets

β€” Tools Required

  • 01
    Crochet hook size 4.5 mm (G)
  • 02
    Tapestry needle & straight pins
  • 03
    Stitch markers
  • 04
    Blocking board or interlocking play mat
  • 05
    Scissors
  • 06
    Optional: pins for shaping during blocking

Progress Tracker

0% Complete

β€” Size :

Info :

8bd" (21.6 cm) from side to side. 7bd" (19 cm) from top to bottom. TIP: To make a smaller leaf, simply use a thinner yarn or thread & smaller size hook.

β€” Materials :

Info :

Red Heart Super Saver Yarn or any other worsted weight yarn (Medium / 4). Tapestry needle & straight pins. Stitch markers. Blocking board (or interlocking play mat).

β€” Hook :

Info :

4.5 mm (G)

β€” Gauge :

Info :

8 sc X 8 rows = 2" X 2" (5 X 5 cm). NOTE: The gauge is not very important for this item & your finished size may vary slightly.

β€” Special Stitches :

Info :

Whip stitch. Sc2(4)tog - [Insert hook in next st, yo & pull up a lp] 2(4) times; yo & pull through all lps on hook. 1 (3) sts decreased.

β€” Stitch Definitions :

Info :

Back post single crochet (Bpsc) - insert hook from back to front to back around post of next st, yo & pull up a lp; yo & pull yarn through 2 lps on hook. Front post single crochet (Fpsc) - insert hook from front to back to front around post of next st, yo & pull up a lp; yo & pull yarn through 2 lps on hook.

β€” Notes :

Info :

This pattern is written using US terms. Place markers as indicated in the instructions and photos for accurate assembly.

β€” Small Leaf :

To beg :

ch 10

Row 1 :

(RS) sc in second ch from hook; sc in next 7 chs; 5 sc in last ch; work across the bottom of foundation ch --> sc in next 6 chs; turn = 19 sts

Row 2 :

(WS) ch 1 (do not count as a st there & throughout); [fpsc around post of next st] 17 times (photos a-1 & a-2, page 4); turn = 17 sts

Row 3 :

(RS) ch 1; sc in next 8 sts; 5 sc in next st; sc in next 6 sts; turn = 19 sts

Row 4-7 :

repeat 2 more times rows 2 & 3

Row 8 :

same as Row 2

Finishing :

Fasten off, leaving a long tail for sewing; weave in the end from the beg. Turn & place a MARKER in 9th st from finishing (photo a-3).

β€” Assembling Maple Leaf :

Info :

Place all small leaves next to each other, with the markers meeting in the center (photo b-1).

Info :

With WS facing you, whip stitch the leaves together across 9 sts on the sides (photo b-2). Remove markers as you go from the left and right leaves, but keep the middle MARKER. Weave in the ends on WS.

β€” Leaf Stalk :

Info :

Make 1 (diagram 2, page 7).

To beg :

holding the leaf with RS facing you & with the center marker facing up, work ch 4 (photo c-1)

Row 1 :

(RS) work across the top 9 sts of right small leaf --> sc in first st on the right (photo c-2), sc in next 6 sts, sc2tog; skip st with MARKER & remove the MARKER (photo c-3); work across the top 9 sts of left small leaf --> sc2tog, sc in next 7 sts, ch 5 (photo c-4); turn = 16 sts & 2 chs on each side

Row 2 :

(WS) sc in second ch from hook; sc in next 3 chs; sc in next 6 sts; sc4tog; sc in next 6 sts; sc in next 4 chs (photo c-5, page 6); turn = 21 sts

Row 3 :

(RS) ch 1 (do not count as a st); [bpsc around post of next st] 10 times; ch 10 (photo c-6, page 6); sc in second ch from hook, sc in next 8 chs (photo c-7, page 6); [bpsc around post of next st] 10 times; sl st in last st (photo c-8, page 6) = 30 sts

Finishing :

Fasten off & weave in all the ends on WS.

β€” Wet Blocking :

Info :

Wet blocking is optional, but recommended. Blocking removes creases & adjusts the shape of crochet pieces.

Wet Blocking Steps :

1. Soak the leaves in warm water; 2. Squeeze excess moisture out; 3. Lay the leaves flat on a blocking board (or interlocking play mat); 4. Shape & pin around the edges (photo d-1); 5. Let the leaves dry.

β€” Diagram :

Info :

Refer to Diagram 1 for Small Leaf and Diagram 2 for Leaf Stalk (page 7) for stitch placement and seaming lines.

Assembly Instructions

  • Place three small leaves with the markers meeting in the center so the right sides face out; align evenly before sewing.
  • With WS facing you, whip stitch the adjacent sides together across 9 stitches on each side to join the small leaves (photo b-2).
  • Remove the side markers as you sew the left and right leaves, but keep the center marker in place until the leaves are secured.
  • Attach the leaf stalk by working across the top 9 stitches of the right small leaf then across the top 9 stitches of the left small leaf as instructed in the Leaf Stalk section.
  • Weave in all ends on the wrong side (WS) after assembly to hide tails and secure seams.

Important Notes

  • πŸ’‘Use stitch markers to keep track of the center and side points; the center marker is essential for correct assembly.
  • πŸ’‘Weave in ends and finish tails on the wrong side (WS) to keep the right side clean and tidy.
  • πŸ’‘Wet blocking will help remove creases and shape the leaf edges for a polished finish.

You did it! This Canadian Maple Leaf pattern brings a little piece of autumn into your home, perfect for coasters, applique9s, or seasonal decor. Try different colors for a collection of leaves to match every season. Happy crocheting and enjoy your handmade leaf creations! πŸ§ΆπŸ‚

You ask,

we answer.

FAQs

What size will the finished piece be?

The finished maple leaf measures approximately 8bd" (21.6 cm) side-to-side and 7bd" (19 cm) top-to-bottom using worsted weight yarn and a 4.5 mm hook.

Can I use a different yarn weight?

Yes, you can use a different yarn weight; however the finished size will change. Use a smaller hook for finer yarns or a larger hook for bulkier yarns and adjust gauge accordingly.

Do I need experience with post stitches?

Some familiarity with front post and back post single crochets is helpful since they create the textured ridges; photos and definitions are provided so you can practice and follow along.

How long does this project typically take?

Most crocheters complete this project in 2-4 hours, though time may vary depending on experience and whether you block your leaves.

Is blocking required?

Blocking is optional but recommended to remove creases and shape the leaf; wet blocking is described with step-by-step instructions.