🧢 Beautiful ✨ Detailed πŸ’ Adorable

Bulbasaur Amigurumi Pattern

Bulbasaur Amigurumi Pattern
4.5β˜… Rating
2-3 Hours Time Needed
1.4K Made This
βœ‚οΈ

Intermediate Level

Ideal for those with basic crochet experience, featuring slightly more advanced stitches and techniques to expand your skills.

⏱️

Bite-Sized Project

Finishes in 2-4 hoursβ€”perfect for an afternoon of creative relaxation.

🧸

Cute Companion

An adorable friend to cherish, handcrafted with love to bring comfort and joy for years to come.

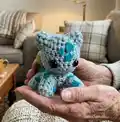
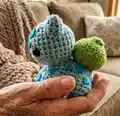
About This Bulbasaur Amigurumi Pattern

This pattern creates a small Bulbasaur amigurumi using worsted weight yarn and simple amigurumi techniques. It includes full row-by-row instructions for the head, body, ears, pod, and legs plus guidance for finishing and assembly. The pattern uses safety eyes, felt markings and easy sewing steps to bring your Bulbasaur to life.

Bulbasaur Amigurumi Pattern crochet pattern - detailed view of completed project

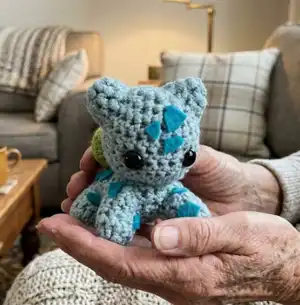
Designed for crocheters who know the basics, it focuses on shaping with increases and decreases and gives clear placement notes. The finished toy is compact and perfect for gifting or display.

Why You'll Love This Bulbasaur Amigurumi Pattern

I absolutely love this pattern because it turns simple stitches into a character with personality and charm. I enjoy how quickly the small pieces come together to form a delightful finished piece that feels rewarding to complete. I love the flexibility of using felt markings or embroidered details to change the expression and style. I also appreciate that it is compact enough to make multiple for gifts, yet detailed enough to practice shaping and seaming skills.

Bulbasaur Amigurumi Pattern step 1 - construction progress Bulbasaur Amigurumi Pattern step 2 - assembly progress Bulbasaur Amigurumi Pattern step 3 - details and accessories Bulbasaur Amigurumi Pattern step 4 - final assembly and finishing

Switch Things Up

I love customizing the colors on this pattern to make other characters or original creatures; swapping the teal for pink or purple makes a totally different vibe.

I often change yarn weight and hook size to alter the finished size; try a finer yarn for a mini keychain or bulky yarn for a squishy plush.

I sometimes embroider the markings instead of using felt to give a stitched, subtle look that lasts through washing.

I add tiny props like a crocheted flower or miniature scarf to give my Bulbasaur unique personality and character.

I also experiment with eye options: plastic safety eyes for a shiny finish, or embroidered eyes for child-safe toys.

I recommend trying different stuffing levels to see how firm or cuddly you prefer the toy to be; a little more stuffing makes it stand better.

I sometimes add a loop of yarn to the top of the head to make a keychain or ornament version for quick gifts.

I like to mix yarn textures, using a slightly fluffier yarn for the pod to create contrast between body and back.

I enjoy creating matching sets by making multiple Pokemon using the same scale and style for cohesive display pieces.

I encourage you to play with the placement and size of felt triangles for markings to craft your own unique expression and style.

Common Mistakes & How to Fix Them

βœ— Placing safety eyes too close together can distort the face; count stitches carefully and space the eyes five stitches apart as instructed. βœ— Not stuffing gradually leads to lumps and accidental flattening; stuff small amounts at a time and shape as you go for a smooth finish. βœ— Skipping stitch counts during increases and decreases will change your piece size; count your stitches at the end of each round to stay accurate. βœ— Pulling yarn too tightly when sewing parts on can pucker the fabric; use moderate tension and pin pieces first to check placement before permanently sewing.

Bulbasaur Amigurumi Pattern

Make an adorable pocket-sized Bulbasaur with this friendly crochet pattern. You will enjoy step-by-step rows for the head, body, ears, pod, arms and legs, plus finishing tips for the felt markings and assembly. Perfect for gifting or decorating your space, this little amigurumi brings a playful, handmade charm to life.

Intermediate 2-3 Hours

Materials Needed for Bulbasaur Amigurumi Pattern

β€” Main Fabric

  • 01
    Worsted weight yarn (#4) - Light Teal/Aqua (main color) - small amount (approx 20-50g)
  • 02
    Worsted weight yarn (#4) - Green (for pod) - small amount (approx 10-30g)
  • 03
    Dark teal felt - small scraps for markings
  • 04
    Polyfil or other soft stuffing - small bag for stuffing head, body, legs and pod

β€” Tools Required

  • 01
    Crochet hook size 3.5mm
  • 02
    Scissors
  • 03
    Tapestry needle
  • 04
    Glue gun or fabric glue
  • 05
    1 pair 10mm safety eyes
  • 06
    Polyester stuffing (polyfil)
  • 07
    Pins for placement (optional)

Progress Tracker

0% Complete

β€” Head :

Row 1 :

CH 2, SC 8 in first stitch. (8 stitches)

Info :

Alternatively, SC 8 into a magic circle

Row 2 :

INC x 8 (16 stitches)

Row 3 :

*SC, INC* x 8 (24 stitches)

Row 4-6 :

SC x 24 (24 stitches)

Row 7 :

*SC x 9*, INC, *SC x 4*, INC, *SC x 9* (26 stitches)

Info :

Place eyes 5 stitches apart (in between each of the increases)

Row 8 :

SC x 26 (26 stitches)

Row 9 :

*SC x 2*, DEC x 11*, *SC x 2* (15 stitches)

Info :

Stuff as much of the head as you can

Row 10 :

*SC x 4*, *DEC x 3*, *SC x 5*

Info :

Finish stuffing head, FO with SlSt.

β€” Body :

Row 1 :

CH 2, SC 6 in first stitch. (6 stitches)

Info :

Alternatively, SC 6 into a magic circle

Row 2 :

INC x 6 (12 stitches)

Row 3 :

*SC, INC* x 6 (18 stitches)

Row 4-6 :

SC x 18 (18 stitches)

Row 7 :

*SC x 5*, INC, *SC x 6*, INC, *SC x 5* (20 stitches)

Row 8-10 :

SC x 20 (20 stitches)

Row 11 :

DEC to close, stuffing the body as you go. FO with a SlSt.

Info :

Sew head onto body (row 1 is the front of the body, and the increases done face the upwards.)

β€” Ears :

Row 1 :

CH 2, SC 6 in first stitch. (6 stitches)

Info :

Alternatively, SC 6 into a magic circle

Row 2 :

*SC, INC* x 3

Row 3 :

*SC 2, INC* x 3

Info :

FO with SlSt

Info :

Sew ears onto head (I've provided a picture to use as a placement guide.)

β€” Pod :

Row 1 :

CH 12, join the ends into a loop with a SlSt. (You're just making a crochet ring with 12 stitches around.) (12 stitches)

Row 2 :

INC x 12 (24 stitches)

Row 3-4 :

SC x 24 (24 stitches)

Row 5 :

*SC 4, DEC* x 4 (20 stitches)

Row 6 :

DEC x 10 (10 stitches)

Row 7 :

DEC x 5 (5 stitches)

Row 8 :

SC 4, SlSt, FO.

Info :

Stuff pod (from the bottom)

Info :

Sew pod to the back of your Bulbasaur

β€” Arms and Legs :

Row 1 :

CH 2, SC 10 in first stitch. (10 stitches)

Info :

Alternatively, SC 10 into a magic circle

Row 2-5 :

SC x 10 (10 stitches)

Info :

FO with SlSt.

Info :

Stuff legs lightly, and sew them onto body. (see pictures to the right and below for placement.)

Info :

Next comes the markings! This part is super simple, just cut out a bunch of triangles/other angled shapes of varying sizes and using the fabric glue/your hot glue gun, fasten them to your Bulbasaur.

Info :

And you're done!

Assembly Instructions

  • Place safety eyes at the front of the head between Row 7 and Row 8, spaced five stitches apart (place in between the increases).
  • Sew the head onto the body so that Row 1 of the body is the front and the increases are facing upwards; secure with a whipstitch and weave in ends.
  • Sew ears onto the top of the head using the provided picture as a placement guide; position symmetrically and secure tightly.
  • Stuff legs lightly and sew four legs onto the underside/sides of the body using pictures for placement reference so the Bulbasaur can sit.
  • Stuff the pod from the bottom, close the opening, and sew the pod to the back/top of the body so it sits centered and secure.
  • Cut felt triangles and other shapes for markings and attach them with fabric glue or a hot glue gun, arranging shapes around head and legs as shown.

Important Notes

  • πŸ’‘Place the safety eyes before closing the head so they sit securely; the pattern suggests placing them five stitches apart between Row 7 and Row 8.
  • πŸ’‘Stuff pieces gradually and shape as you go; finish stuffing before completing the final closing rows for smooth shaping.
  • πŸ’‘Use fabric glue or a hot glue gun for felt markings if you do not want to sew them; press gently and allow glue to dry fully before handling.

This Bulbasaur amigurumi pattern is a tiny, lovable project that turns simple stitches into a delightful companion. Perfect for collectors, gifts, or a quick creative treat. Make a few in different colors or customize markings for your own unique Pokemon! 🧢✨😊

You ask,

we answer.

FAQs

What size will the finished piece be?

The finished amigurumi will be a small, pocket-sized Bulbasaur when using worsted weight yarn and a 3.5mm hook; expect a toy a few inches tall depending on tension.

Can I use different yarn weights for this pattern?

Yes, you can use different yarn weights but the final size will change; use a hook appropriate for your yarn and note that a bulkier yarn will make a chunkier Bulbasaur.

Do I need prior crochet experience for this pattern?

This pattern is rated intermediate, so basic knowledge of single crochet, increases, decreases, working in rounds, and basic sewing is recommended.

How long does this project typically take to complete?

Most crocheters finish this pattern in about 2-3 hours, though time may vary by experience level and how much time you spend on assembly and markings.

Can I substitute safety eyes with embroidered eyes?

Yes, you can embroider eyes instead of using safety eyes for a child-safe toy or for a different look; embroider before final stuffing and closing for best results.