๐Ÿงถ Beautiful โœจ Detailed ๐Ÿ’ Adorable

Bee-utiful Pimp Your Bag Pattern

Bee-utiful Pimp Your Bag Pattern
4.2โ˜… Rating
5-7 Hours Time Needed
1.6K Made This
โœ‚๏ธ

Intermediate Level

Ideal for those with basic crochet experience, featuring slightly more advanced stitches and techniques to expand your skills.

โฑ๏ธ

Weekend Treat

Takes 5-7 hours, making it an enjoyable project to finish over a couple of days.

โœจ

Stylish Touch

An elegant detail to elevate any look, combining traditional techniques with contemporary design sensibilities.

About This Bee-utiful Pimp Your Bag Pattern

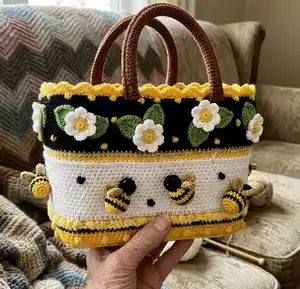
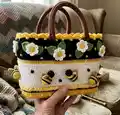
This pattern teaches you how to crochet a decorative strip to transform a straw bag into a sunny, bee-themed accessory. You will make flowers, leaves, bobbles and small stuffed bees, then attach them to a crocheted band that fits snugly around the bag. Techniques include bobble stitch, small amigurumi pieces, applique sewing and simple edging chains.

Bee-utiful Pimp Your Bag Pattern crochet pattern - detailed view of completed project

Perfect for making a unique summer bag or a handmade gift, this pattern uses a mix of yarns for texture and sparkle. Detailed step-by-step rounds and finishing instructions help you assemble the pieces neatly.

Why You'll Love This Bee-utiful Pimp Your Bag Pattern

I absolutely love this pattern because it brings playful, textural details to a plain bag and turns it into a cheerful statement piece. I love combining different yarns like Softy, Twinkle and Colour Crafter to create contrast and sparkle. I enjoy making the tiny bees and flowers โ€” they are quick, addictive little pieces that add a lot of personality. I also love that the finished band can be removed or rehung, so you can update your bag seasonally or mix and match colors.

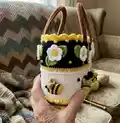
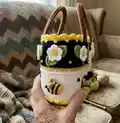
Bee-utiful Pimp Your Bag Pattern step 1 - construction progress Bee-utiful Pimp Your Bag Pattern step 2 - assembly progress Bee-utiful Pimp Your Bag Pattern step 3 - details and accessories Bee-utiful Pimp Your Bag Pattern step 4 - final assembly and finishing

Switch Things Up

I love customizing this band by swapping yarn colors to match seasonal looks; try pastel tones for spring or bold primary colors for a playful summer bag.

Switch the textured yarns: replace the soft fluffy yarn with a smooth worsted yarn for a sleeker finish, or use a thicker yarn for a chunkier statement band.

I sometimes make the bees larger or smaller by changing hook size and adjusting rounds so each bee becomes a unique accent on the bag.

Try different bead sizes for the bee eyes or embroider tiny faces instead of beads for a softer, child-friendly option.

You can add tiny crocheted outfits for the bees or small props like miniature flowers to make a themed set of bags.

For a more subtle look, reduce the number of bobbles and use tonal yarns so the texture reads more quietly while keeping the applique shapes.

I often experiment with placement: cluster flowers at one side for an asymmetrical design or space them evenly to create a band that reads balanced around the bag.

If I want a removable band, I add a few snaps or small buttons inside the band to secure it to the bag without sewing permanently.

To create a matching set, I crochet smaller versions of the bag band as wristlets or a coordinating coin pouch using the same motifs.

Finally, I sometimes embroider extra details on petals or leaves for added depth and personalization before attaching them to the band.

Common Mistakes & How to Fix Them

โœ— Skipping the starting chain measurement can make the band too tight or too loose; measure the chain against the bag circumference before joining and adjust the chain length as needed. โœ— Crocheting too tightly causes the band not to slide over the straw bag easily; use relaxed tension and check fit often while working to ensure proper snugness. โœ— Forgetting to stuff the bees before closing makes them lumpy or misshapen; stuff gradually and shape as you go to get smooth, rounded bodies. โœ— Not securing the crocheted band to the bag can allow shifting over time; sew the top and bottom edges to the straw bag in a few places to hold the work in place.

Bee-utiful Pimp Your Bag Pattern

Give a plain straw bag a cheerful, summery makeover with this Bee-utiful crochet add-on. You will crochet a decorative band with flowers, leaves, bobbles and tiny bees to fit around a straw bag, and finish with playful details and beads. The pattern combines simple amigurumi bees and applique pieces with seamless rounds to create a bright, wearable accessory you'll love to take out and show off.

Intermediate 5-7 Hours

Materials Needed for Bee-utiful Pimp Your Bag Pattern

โ€” Main Fabric

  • 01
    Scheepjes Colour Crafter yarn - Black (Ede 1002) - quantity: enough for full black band sections
  • 02
    Scheepjes Colour Crafter yarn - White (Barneveld 1005) - quantity: enough for white mid band
  • 03
    Scheepjes Colour Crafter yarn - Yellow Ochre (Eindhoven 1114) - quantity: enough for yellow stripes and details
  • 04
    Scheepjes Softy yarn - Yellow (489) - quantity: for fluffy white band/bobbles accents
  • 05
    Scheepjes Panda yarn - White (581) - quantity: for white chain detail (Panda yarn specified)
  • 06
    Scheepjes Softfun yarn - Denim Green (506) - quantity: for leaves
  • 07
    Scheepjes Twinkle yarn - Gold (941) - quantity: for gold bobbles and chains
  • 08
    Fiberfill stuffing - small amount for stuffing each bee
  • 09
    Gold-colored rocaille beads - for bee eyes

โ€” Tools Required

  • 01
    5 mm crochet hook
  • 02
    Straw bag with a circumference of 84 cm and 21 cm tall (base bag to embellish)
  • 03
    Fiberfill stuffing for the bees
  • 04
    Gold-colored beads (rocaille beads) for bee eyes
  • 05
    Keychain with ring (optional) to attach an extra bee
  • 06
    Scissors
  • 07
    Yarn needle for sewing and weaving in ends
  • 08
    Pins for placement when sewing pieces to the band

Progress Tracker

0% Complete

โ€” Individual bobbles :

Info :

For this bag, you'll be using the bobble stitch in addition to the usual stitches. Crochet the bobble stitch as follows: Draw up the yarn through your work so that you have a loop on the hook. Yarn over hook, insert the hook in the same spot and draw the yarn up, rep this 2 more times: you now have 7 loops on your hook. Yarn over hook and draw the yarn through the 7 loops, crochet 1 ch. Insert the hook into the work, draw up the yarn and end with 1 sl st. Pull the thread tight and fasten off.

โ€” Bag :

Info :

Crochet the bag with sc around and from the top down. Crochet a starting chain that fits around the circumference of the bag. Don't crochet too loosely, but it shouldn't be too tight either.

Round 1-13 :

Crochet 6 cm sc with black, change to yellow ochre

Round 14-18 :

Crochet 2 cm sc, change to Barneveld white

Round 19-35 :

Crochet 7 cm sc, change to yellow

Round 36 :

Crochet sc with gold

Round 37-40 :

Crochet 1 cm sc with yellow, change to black

Round 41-42 :

Crochet 1 cm sc, change to yellow ochre

Round 43-47 :

Crochet 2 cm sc, change to black

Round 48-53 :

Crochet 2 cm sc. The total height of your work should now be 21 cm. Fasten off all threads and slide your crocheted work over the bag.

Info :

Crochet another 2 rounds of sc on top of the beginning round. Skip a couple of sc where the straps are. Continue with yellow ochre.

Round 1 :

1 sc, *5 ch, skip 4 sc, 1 sc*, rep from * to *

Round 2 :

Crochet around the ch-loop from the previous round *1 sc, 1 hdc, 1 dc, 1 hdc, 1 sc*, rep from * to *

โ€” Flower :

Round 1 :

With white, make a MR. Rnd 1: 18 sc in the MR, join with 1 sl st

Round 2 :

*3 ch, 1 dc in the next sc, 3 ch, 1 sl st in the next sc*. This is the first petal. Rep 5 more x from * to * (= 6 flower petals in total). Fasten off.

Round 3 :

Continue with yellow. Crochet from the middle 1 sc around the sc from the previous round, skip 1 sc, 1 sc, rep until you have made 9 sc, fasten off.

โ€” Leaf :

Info :

With green, make a chain with 9 ch. Crochet 1 sc in to the 2nd ch from the hook, 1 hdc in the next ch, then 1 dc, 1 tr, 1 dc, 1 hdc, 1 sc, 2 ch and continue on the other side of the chain. Crochet into the 8 stitches: 1 sc, 1 hdc, 1 dc, 1 tr, 1 dc, 1 hdc and 1 sc. Fasten off, leaving a long tail. Make as many leaves as you want in the same way and sew them underneath the flowers.

โ€” Bee :

Head :

With black, make a MR. Rnd 1: 6 sc in the MR. Rnd 2: 2 sc in every sc (= 12). Rnd 3: 12 sc. Rnd 4: sc2tog (= 6). Fasten off, leaving a long tail. Stuff the head.

Body :

With yellow ochre, make a MR. Rnd 1: 6 sc in the MR. Rnd 2: 2 sc in every sc (= 12), change to gold. Rnd 3: 1 sc, 2 sc in next sc (= 18), change to yellow ochre. Rnd 4: 18 sc, change to gold. Rnd 5: 18 sc, change to yellow ochre. Rnd 6: 1 sc, sc2tog, rep (= 12). Rnd 7: sc2tog (= 6), fasten off. Stuff the body. Sew the open sides of the head and the body together.

Wings (2 X) :

Make a MR with gold. Rnd 1: 6 sc in the MR, turn. Rnd 2: 2 hdc in every sc, fasten off. Sew the wings onto the body.

Finishing the bee :

Sew 2 gold-colored beads (rocaille beads) onto the bee's head for the eyes.

โ€” Finishing :

Info :

Crochet 10 flowers and leaves and 8 bees (with an optional extra bee for the keychain). Attach the leaves underneath the flowers and attach them to the black part of the bag (= Rnd 1-13). Sew the bees onto the white part of the bag (= Rnd 19-35).

Info :

Using the gold, crochet several bobbles among the flowers and with black and white several bobbles around the bees. Attach the extra bee to the keychain if you are using a keychain.

Info :

To prevent the crocheted work from shifting, sew the top and bottom part of the crocheted bag to the straw bag. Fold the black bottom edge over as you do this.

Finishing the bag :

Crochet a gold chain onto Rnd 14. Crochet a Panda white chain onto Rnd 18. Crochet a gold chain onto Rnd 47. Crochet yellow bobbles around the bag spaced 3.5 cm apart onto Rnd 45.

Assembly Instructions

  • Attach the leaves underneath each flower and sew the complete flower appliques onto the black section of the bag (the area made in Rnd 1-13), spacing them evenly.
  • Sew each bee to the white mid-section of the bag (the area crocheted in Rnd 19-35), ensuring they are securely attached and evenly spaced.
  • Sew the top and bottom edges of the crocheted band to the straw bag in several places to prevent shifting, folding the black bottom edge under as you attach it.
  • Add gold-colored beads as eyes to each bee and, if desired, attach an extra bee to a keychain ring and secure the ring to the bag handle or strap.
  • Sew wings onto each bee body in position before attaching the bee to the bag so the wings are stable and sit correctly.
  • Pin pieces in place and check symmetry before final sewing to ensure even placement and clean finish.

Important Notes

  • ๐Ÿ’กUse a starting chain that fits the bag circumference exactly; adjust the chain length before joining so the band sits snugly but not stretched.
  • ๐Ÿ’กKeep consistent tension throughout the band to ensure the decorated strip fits the bag evenly and maintains correct height.
  • ๐Ÿ’กFasten off and weave in ends before attaching pieces to the bag to avoid loose ends showing on the finished project.
  • ๐Ÿ’กStuff the bees lightly and evenly; overstuffing can distort the shape and make sewing the pieces difficult.

This cheerful Bee-utiful bag makeover adds sunny color and playful details to any straw bag, turning it into a wearable work of art. The mix of textures and tiny amigurumi bees makes this project feel magical and handmade. Try different colorways for endless variations and happy summer vibes! ๐Ÿโœจ

You ask,

we answer.

FAQs

What size will the finished piece be?

The crocheted band is designed to fit a straw bag with a circumference of 84 cm and final height about 21 cm, as stated in the materials list.

Can I use different yarn weights for this pattern?

Yes, you can substitute yarns but the finished size and drape will change; choose a hook appropriate to the yarn weight and check the fit around the bag as you work.

Do I need prior crochet experience for this pattern?

This pattern is rated Intermediate because it uses bobble stitch, small amigurumi sewing, and multiple yarn types, so basic stitches and joining experience are recommended.

How long does this project typically take to complete?

Most crocheters complete this project in 5-7 hours, though time may vary depending on how many embellishments you make and your finishing speed.

How do I prevent the crocheted band from sliding on the straw bag?

Sew the top and bottom edges of the crocheted band to the straw bag in a few places and fold the black bottom edge under as you attach it to secure the band.