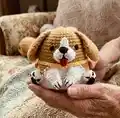
Make an adorable Beagle amigurumi with clear round-by-round instructions and helpful assembly notes. This pattern uses 4-ply cotton blend yarn and compact stitches so you can create a charming little toy suitable for gifts or display. Follow the exact stitch counts and placement tips for a neat, professional finish.
Progress Tracker
0% Complete
— Head and Body (Beagle) :
Info :
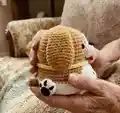
Start with brown yarn. Leave a long starting yarn tail, approximately 10 cm (4"). This tail will be used to join 2 dogs to make a reversible amigurumi.
Round 3 :
[sc, inc] x6 (18)
Round 4 :
[sc, inc, sc] x6 (24)
Round 5 :
[3sc, inc] x6 (30)
Round 6 :
[2sc, inc, 2sc] x6 (36)
Round 7 :
[5sc, inc] x6 (42)
Round 9 :
[3sc, inc, 3sc] x6 (48)
Round 14 :
[7sc, inc] x6 (54)
Info :
Starting from R15, we will crochet using black, brown, and white yarn alternately. To simplify the writing, black, brown, and white color of the font below corresponds to the yarn colors. Important tips: when doing color changes in reversible amigurumi, I don't recommend using the tapestry technique because it tends to tighten the color changing rounds. It is recommended to cut and start with a new yarn every time you change the yarn color.
Round 15 :
BLO 5sc, 17sc, 10sc, 17sc, 5sc (54)
Round 16 :
6sc, 15sc, 12sc, 15sc, 6sc (54)
Round 17-18 :
7sc, 13sc, 14sc, 13sc, 7sc (54)
Round 19 :
8sc, 11sc, 16sc, 11sc, 8sc (54)
Round 20 :
4sc, inc, 3sc, 5sc, inc, 5sc, 3sc, inc, 8sc, inc, 3sc, 5sc, inc, 5sc, inc, 3sc, inc, 4sc (60)
Round 21-22 :
10sc, 11sc, 18sc, 11sc, 10sc (60)
Info :
Fasten off, cut the yarn and do invisible finish.
— EARS (make 2) :
Round 3 :
[sc, inc] x6 (18)
Round 4 :
[8sc, inc] x2 (20)
Round 9 :
[3sc, 2dec, 3sc] x2 (16)
Round 10 :
3sc, dec, 6sc, dec, 3sc (14)
Round 11 :
2sc, dec, 5sc, dec, 3sc (12)
Round 12 :
2sc, dec, 4sc, dec, 2sc (10)
Round 13 :
sc, dec, 3sc, dec, 2sc (8)
Round 14 :
2sc, then flatten and work through both stitches: 3sc (3)
Info :
Fasten off, leave a long tail for sewing.
— MUZZLE :
Info :
Make an oval by crocheting around the foundation ch. Start with white. Make a foundation ch: 5 ch.
Round 1 :
From the second ch from hook: 3 sc, then inc3 in the last st. Continue on the other side of the foundation ch: 2sc, inc (10)
Round 2 :
inc, 2sc, 3inc, 2sc, 2inc (16)
Round 4 :
3 sl st, 4 ch, sc, 2 hdc, sl st
Info :
Leave the remaining st unworked. Fasten off, leaving a long tail for sewing. Do invisible finish.
— FRONT LEGS (make 2) :
Round 4 :
3 sc, inc, 4 sc (9)
Round 5 :
4 sc, inc, 4 sc (10)
Info :
No need to stuff. Last round: flatten and work through both stitches 5 sc (5). Fasten off, leaving a long tail for sewing.
— PAWS (make 2) :
Info :
Start with black yarn. Work in joined rounds.
Round 1 :
6 sc in MR (6), join to the first sc with a sl st. Change to white. Cut the black yarn leaving about 20 cm long tail.
Round 2 :
BLO, loosely 6 sl st (6), join to the first st with a sl st. Make 1 ch.
Round 3 :
3 inc, loosely 3 sl st (9), join to the first sc with a sl st.
Round 4 :
[bobble st, sl st] x3 (6)
Info :
Fasten off, leave a long tail for sewing, and do invisible finish. Using the black tail, embroider paws on every bobble st.
— TAIL :
Round 6 :
2 sc, 2 dec, 2 sc (6)
Info :
No need to stuff. Fasten off, leave a long tail for sewing and do invisible finish.
— TONGUE :
Info :
Start with red yarn. Make 3 ch, then start from the second loop from the hook, work 2 sc. Fasten off and leave a long tail for sewing.
— ASSEMBLY :
Item :
Attach the muzzle (bowl shaped) on the head between R11-13, and the flap (the flat part at the top of the muzzle) between R8-10. Stuff the muzzle with fiberfill lightly.
Item :
Attach the ears, with the top part located between R4-5. You may also sew the ears at some parts to fix the position.
Item :
Attach the front legs on the body between R16-22 with a slightly tilted position.
Item :
Embroider the lines of toes on the front legs with black (1 ply only) yarn.
Item :
Attach the paws on the body between R18-22, right beside the front legs.
Item :
Attach the tail at the back of the body, between R21-22.
Item :
Embroider the eyes using black yarn, at R10, 1 st apart from the widest part of the muzzle.
Item :
Embroider the nose on the muzzle using black yarn.
Item :
Attach the tongue on the muzzle.
Item :
Embroider the mouth using black yarn (2 ply).
— Base for Single Toy :
Info :
If you are going to make a single toy (not as a reversible one), you can close the hole by sewing a round flat piece as the base. To make the base, use brown yarn.
Round 3 :
[sc, inc] x6 (18)
Round 4 :
[sc, inc, sc] x6 (24)
Round 5 :
[3sc, inc] x6 (30)
Round 6 :
[2sc, inc, 2sc] x6 (36)
Round 7 :
[5sc, inc] x6 (42)
Round 8 :
[3sc, inc, 3sc] x6 (48)
Round 9 :
[7sc, inc] x6 (54)
Round 10 :
[4sc, inc, 4sc] x6 (60)
Info :
Fasten off. Leave a long tail for sewing. Stuff the body with fiberfill (you can continue stuffing while sewing the base). Prepare a circular piece of cardboard or rigid plastic to fit inside the bottom of the body. This will help the base stay flat so the toy can stand well. Place the cardboard/rigid plastic to the bottom, and sew the base to the BL of the last round of the body.
This Beagle Amigurumi pattern is designed to bring a tiny, lovable companion to life with clear step-by-step rounds and detailed assembly guidance. Whether you make a single-sided toy or a reversible pair, the compact size and adorable details make it a perfect handmade gift. Have fun stitching every little paw and floppy ear — your new furry friend is waiting! 🧶🐶✨