🧢 Beautiful ✨ Detailed πŸ’ Adorable

Anatomical Heart Amigurumi Pattern

Anatomical Heart Amigurumi Pattern
4.4β˜… Rating
5-7 Hours Time Needed
2.0K Made This
βœ‚οΈ

Intermediate Level

Ideal for those with basic crochet experience, featuring slightly more advanced stitches and techniques to expand your skills.

⏱️

Weekend Treat

Takes 5-7 hours, making it an enjoyable project to finish over a couple of days.

🧸

Cute Companion

An adorable friend to cherish, handcrafted with love to bring comfort and joy for years to come.

About This Anatomical Heart Amigurumi Pattern

This pattern creates a small anatomical-style heart amigurumi with detachable arteries and veins you sew on after crocheting. It uses simple amigurumi constructionβ€”working in continuous roundsβ€”plus small tubular pieces for vessels. You will learn shaping, invisible decrease, and how to attach tiny details for a finished realistic look. The result is a colorful, educational, and tactile mini heart perfect for gifts or study.
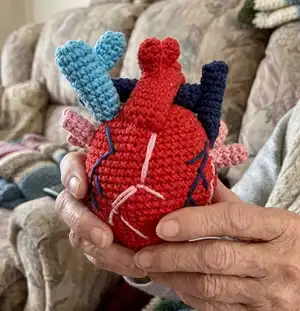
Anatomical Heart Amigurumi Pattern crochet pattern - detailed view of completed project

Detailed step-by-step rounds are provided for the heart and every vessel, plus photos to guide assembly. Color coding for arteries and veins helps you place and sew parts accurately for a professional finish.

Why You'll Love This Anatomical Heart Amigurumi Pattern

I absolutely love this pattern because it combines crochet technique with an educational twist that sparks curiosity. I enjoy designing small, detailed pieces that teach anatomy while still being cute and tactile. The tiny vessels and embroidered arteries let me be creative with color and placement every time I make one. I also love how satisfying it is to watch the simple rounds become a recognisable heart as you stuff and sew the parts together.

Anatomical Heart Amigurumi Pattern step 1 - construction progress Anatomical Heart Amigurumi Pattern step 2 - assembly progress Anatomical Heart Amigurumi Pattern step 3 - details and accessories Anatomical Heart Amigurumi Pattern step 4 - final assembly and finishing

Switch Things Up

I love how easily you can customise this pattern: change the main body color to pink or a pastel red for a softer, whimsical look.

You can switch yarn weight and hook size to make the heart larger or smaller; using DK or worsted yarn with a bigger hook will give you a chunky, more huggable version.

I often add felt labels or small embroidered tags to identify each vessel for classroom use β€” it's a great learning aid for kids and students.

Try different color schemes: bright clinical colors for an educational model, or matching tones for a cute gift-ready toy.

I sometimes add a loop at the top so it becomes an ornament or keychain; just crochet an extra chain and secure it in Round 1 before stuffing.

For a more realistic texture, embroider subtle veins with a slightly darker shade of the body color instead of contrasting thread.

If you want a softer shape, reduce stuffing slightly and block the finished piece by hand to encourage a flatter base for display.

I also enjoy creating miniature outfits or tiny accessories β€” a tiny stethoscope or tiny label can make it a charming educator gift.

Try combining this heart with other organ amigurumi to make a small anatomy set β€” scale the pieces consistently by using the same yarn and hook sizes.

Lastly, experiment with placement and number of vessels to match your preferred anatomical accuracy or artistic composition; pin everything before sewing until you are happy with the look.

Common Mistakes & How to Fix Them

βœ— Skipping stitch markers during continuous rounds causes you to lose the start of the round; place a marker at the first stitch of every round to stay oriented. βœ— Overstuffing the heart makes the shape distort and stitches spread; stuff gradually, molding the shape as you go and stop before stuffing shows through the stitches. βœ— Closing the magic ring too early can leave a gap or uneven center; pull the tail gently and then tighten again after a round or two to ensure a neat closure. βœ— Joining rounds with a slip stitch when the pattern asks for a spiral will create a ridge; work in continuous spiral and do not join with slip stitches where instructed. βœ— Forgetting to hide or secure tails leads to loose ends later; weave in and hide tails after you fasten off each small detail before assembly. βœ— Not counting stitches after increases or decreases can break the shaping sequence; count at the end of each round until you are comfortable with the pattern.
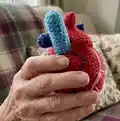
Anatomical Heart Amigurumi Pattern

Make an anatomically inspired crocheted heart full of character and educational detail. This pattern walks you through shaping the heart body and crocheting arteries and veins as separate details so you can sew them on. You will enjoy stitching tiny tubes, adding color-coded vessels, and embroidering surface arteries for a realistic finish. Perfect as a gift, classroom model, or unique handmade keepsake.

Intermediate 5-7 Hours

Materials Needed for Anatomical Heart Amigurumi Pattern

β€” Main Fabric

  • 01
    50 g / 160 m (approx) cotton or cotton-blend yarn (example YarnArt Jeans or Alize Cotton Gold) - RED (main body)
  • 02
    Small amounts of NAVY (for pulmonary arteries and some vessels) - approx 10-20 g
  • 03
    BLUE (superior vena cava or vessels) - approx 10-20 g
  • 04
    ORANGE or PINK (pulmonary veins and small vessels) - approx 10-20 g
  • 05
    Accent color (white or light pink) for embroidered arteries - small quantity

β€” Tools Required

  • 01
    Crochet hook size 1.75mm to 2.5mm (depending on yarn brand and desired tightness)
  • 02
    Polyester stuffing (fiberfill)
  • 03
    Scissors
  • 04
    Sewing/yarn needle
  • 05
    Stitch markers
  • 06
    Pins for assembly (optional)

Progress Tracker

0% Complete

β€” Heart :

Info :

Keep stuffing the heart as you go.

Round 1 :

6 sc in MR. Pull tail tightly to close: grab the yarn tail and pull down. You will need to hold your stitches still to get the ring to close.

Info :

As you do this, the turning chain and the last stitch of the round will come closer together. I often will pull mine tight again after another round or two just to make sure it's closed tightly.

Info :

We are working in a continuous spiral, so do not join the round with a slip stitch. Start the next round in the first stitch of Round 2.

Round 2 :

6 inc (12)

Round 3 :

(1 sc, inc) x 6 (18)

Round 4 :

(2 sc, inc) x 6 (24)

Round 5 :

(3 sc, inc) x 6 (30)

Round 6-7 :

30 sc

Round 8 :

(4 sc, inc) x 6 (36)

Round 9 :

36 sc

Round 10 :

(5 sc, inc) x 6 (42)

Round 11 :

42 sc

Round 12 :

(6 sc, inc) x 6 (48)

Round 13 :

48 sc

Round 14 :

(7 sc, inc) x 6 (54)

Round 15-18 :

(4 rounds): 54 sc

Round 19 :

(7 sc, dec) x 6 (48)

Round 20-22 :

(3 rounds): 48 sc

Round 23 :

(6 sc, dec) x 6 (42)

Round 24-25 :

(2 rounds) 42 sc

Round 26 :

(4 sc, dec) x 7 (35)

Round 27 :

35 sc

Round 28 :

(3 sc, dec) x 7 (28)

Round 29 :

(3 sc, dec) x 5, 3 sc (23)

Round 30 :

(sc, dec) x 7, 2 sc (16)

Round 31 :

(1 sc, dec) repeat to the end. Sew up a hole with needle – just grab 'Front loop only' in this Round. Pull tail tightly to close. Fasten off, cut yarn.

β€” AORTA (red) :

Item Name (Big - aortic arch) :

R1: 12 sc in MR. Don't pull tail. We don't need to close the hole.

Info :

We are working in a continuous spiral, so do not join the round with a slip stitch. Start the next round in the first stitch of Round 2.

Round 2-24 :

12 sc, slip stitch. Fasten off, leaving a tail for sewing.

Item Name (Small - three branch details) :

Small (3 details: - Brachiocephalic artery, - Left common carotid artery, - left subclavian artery)

Round 1 :

6 sc in MR. Pull tail tightly to close: grab the yarn tail and pull down. You will need to hold your stitches still to get the ring to close.

Round 2-4 :

6 SC, slip stitch. Fasten off, leaving a tail for sewing.

Info :

Sew 3 small details to the big detail (aortic arch). Hide tail. Cut yarn.

Info :

Sew aortic arch to the heart.

β€” PULMONARY ARTERIES (navy) :

Item Name (Big) :

R1: 10 sc in MR. Pull tail. Don't join.

Round 2-16 :

10 SC, SS. Hide tail. Cut yarn.

Item Name (Small) :

R1: 8 sc in MR. Don't pull tail. We don't need to close the hole.

Round 2-8 :

8 SC, SS. Sew small detail to the center big detail. Hide tail. Cut yarn.

Info :

Sew on the heart's side, perpendicular to the aorta.

β€” SUPERIOR VENA CAVA (blue) :

Item Name (Big) :

R1: 12 sc in MR. Don't pull tail. We don't need to close the hole.

Round 2-10 :

12 SC, SS. Hide tail. Cut yarn.

β€” PULMONARY VEINS (orange or pink) :

Item Name (2 Left Pulmonary Veins) :

R1: 6 sc in MR. Don't pull tail. We don't need to close the hole. Start the next round in the first stitch of Round 2.

Round 2-4 :

6 SC, SS. Hide tail.

Item Name (2 Right Pulmonary Veins) :

R1: 6 sc in MR. Don't pull tail. We don't need to close the hole. Start the next round in the first stitch of Round 2.

Round 2-4 :

6 SC, SS. Hide tail.

β€” Small Vessel Details & Final Assembly :

Info :

Sew 2 details to the left side. Sew 2 details to the right side (look to the photo for placement).

Info :

Embroider arteries on the heart using contrasting yarn for surface veins and arteries. Pin parts in place before sewing for best symmetry.

Assembly Instructions

  • Sew aortic arch to the top of the heart, aligning the long curve with the heart's center seam; hand-sew through the base of the arch with the tail left from the arch and secure with small neat stitches.
  • Attach the three small aortic branches to the aortic arch (brachiocephalic, left common carotid, left subclavian) and hide tails before trimming for a tidy finish.
  • Position the pulmonary arteries (navy) perpendicular to the aortic arch on the heart's top left area and sew securely through the base, tucking yarn tails into the heart.
  • Sew the superior vena cava (blue) to the back/top of the heart using the tail left from the tube; use pins to hold it in place and sew with small whipstitches for stability.
  • Place and sew pulmonary veins (pink/orange) two on the left and two on the right according to the photos, then embroider surface arteries and veins with contrasting yarn to match the example.
  • Pin everything in place and check balance before final stitching; weave in and hide all ends securely inside the body to prevent fraying.

Important Notes

  • πŸ’‘Crochet continuously in rounds unless otherwise specified and use a stitch marker at the beginning of each round to keep track of your stitches.
  • πŸ’‘Stuff gradually and shape as you go; overstuffing will distort the heart shape and stuffing should not be visible through stitches.
  • πŸ’‘Pin parts in place before sewing to ensure correct positioning and symmetry, especially for the aortic arch and pulmonary vessels.
  • πŸ’‘Work with consistent tension for even rounds and count stitches after increases and decreases to ensure correct shaping.

This anatomical heart amigurumi is a charming mix of craft and science, perfect as a teaching aid or a quirky handmade gift. Add color and personality with your yarn choices, and enjoy stitching tiny vessels and embroidered arteries for a realistic finish. Whether you make one or a whole set, it's a joyful project that educates and delights. 🧢❀️✨

You ask,

we answer.

FAQs

What size will the finished piece be?

The finished amigurumi measures approximately 4-5 inches (10-12 cm) tall when using the recommended yarn and hook size.

Can I use different yarn weights for this pattern?

Yes, you can use different yarn weights, but this will affect the final size. Use an appropriate hook for your chosen yarn and expect the heart to change proportionally.

Do I need prior crochet experience for this pattern?

This pattern is rated intermediate, so basic knowledge of single crochet, increases and decreases, and working in the round is recommended for best results.

How long does this project typically take to complete?

Most crocheters complete this project in 5-7 hours, though time may vary based on experience level, yarn choice, and how much time you spend on assembly and embroidery.

How should I attach the vessels so they stay secure?

Use the long tail from each tube to sew it through the heart base with small, tight stitches and weave the tail inside the body before trimming to secure each vessel.