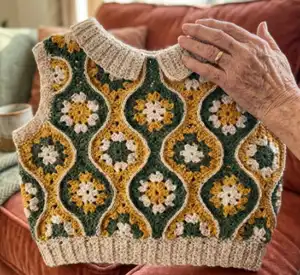
Make a playful, retro-inspired Ada top using modular granny lantern motifs joined into a fitted sleeveless vest. This pattern guides you through making lantern motifs, joining rows, and adding neat ribbed edges for the waist, armholes and a charming collar. Written in US terms and sized XS–5X, it is perfect if you enjoy modular crochet and colour play. Detailed photos and practical tips help you get a professional finish.
Progress Tracker
0% Complete
— Information :
Info :
yarn type: I used Katia Capri which is yarn weight 2 (Fine/4ply), but it is also possible to use weight 3 yarn (8ply/DK/Light Worsted), just make sure your gauge is right.
Info :
yarn amount: I used 3 different colours, here I give the approximate amount of balls that you'll need for each size (1 ball = 50 g/125 m/137 yds). If you're making the longest version of the top, you might need an extra ball of each colour. size 1A*/1A: 3 balls of each colour. size 1B/1C: 4 balls of each colour. size 1C: 5 balls of each colour. size 2A: 6 balls of each colour. size 2B: 7 balls of each colour.
Infos :
other materials needed: crochet hooks (I used 3.5 mm, 4 mm, and 5 mm, but this depends on your gauge). tapestry needle to seam in the ends. scissors. tape measure. 1 small button (with a diameter of approx. 1 cm/0.4 inch).
Infos :
stitches, abbreviations and symbols used: blo (back look only). ch (chain). ch sp (chain space). hdc (half double crochet). dc (double crochet). sc (single crochet). slst (slip stitch). st (stitch). tc (triple crochet). yo (yarn over). * and ** (repeat from/until here).
— Determining the size :
Info :
To know which size is best for you, determine your chest size (by measuring the fullest part of your chest) and have a look at the size chart in the pattern to determine your size. If you're in between sizes, choose if you want a tighter fitting top (then size down) or a more relaxed fitting top (then size up). Use the crochet hook that corresponds with your size in the chart (3.5 mm for size 1A*, 4 mm for the other sizes) and measure the first lantern you finish; measure peak to peak and width side to side. Choose length S (short), M (medium) or L (long) as desired. Note: if your chest measurement is between 65-75 cm (25.6-29.5 in), follow instructions for size 1A but size down on your hook.
— Choosing the colours :
Info :
You'll need 3 different colours; the pattern refers to these as colour A, B, and C. In the photos used in this pattern, colour A = white, colour B = yellow, colour C = green. You can choose any colour order and use the charts to place the colours correctly when joining.
— Making the lanterns :
Info :
some important notes on the lanterns: read the pattern horizontally (so by row, not by column). you want your Ada top to have a nice stretch, so don't make your stitches too tight. to be sure your gauge is right, start with the crochet hook that corresponds with your size and measure the first lantern you finish. size 1A*: the lanterns should be 13 x 8 cm / 5.1 x 3.1 in. size 1A/2A: the lanterns should be 14 x 9 cm / 5.5 x 3.5 in. size 1B/2B: add 1 extra row, so the lanterns should be 15 x 10 cm / 5.9 x 3.9 in. size 1C: you add 2 extra rows, so the lanterns should be 16 x 11 cm / 6.3 x 4.3 in.
Info :
If your lantern is too small, start over with a bigger hook. If it is too large, start over with a smaller hook. I highly recommend weaving in the ends after you finish each lantern instead of doing them all at the end because weaving in 1.000 loose ends when you finish the top is not fun.
— Motif: normal lantern :
Note :
Check the chart below to see how many of these you need and in what colour order. Note: colour order A - B - C means that the 1st colour you use for the lantern is A, the 2nd is B and the 3rd is C. So then row 0 and 1 are in colour A, row 2 is colour B, and row 3-6 are in colour C.
Row 0 :
start with the 1st colour, ch4, join with a slst in the 1st chain to make a loop (I don't recommend using a magic ring in this pattern).
Row 1 :
ch3, 2dc in the loop, *ch2, 3dc in the loop* repeat * 4 more times, ch2, join with a slst to the top ch of the ch3, fasten off.
Row 2 :
attach 2nd colour in a ch sp, ch3, 2dc in the same ch sp, *in the next ch sp: 3dc, ch2, 3dc* repeat * 4 more times, join with a slst to the top ch of the ch3, fasten off.
Row 3 :
attach 3rd colour in the space between 2 ch sp (see photo), ch3, 2dc in the same space. Start with 3dc, ch6 (this makes the peak), dc in the 4th ch from the hook, dc in the next 2 ch, 3dc in the same chain space. In the next 5 spaces: 3dc, 6dc, 3dc, 6dc, 3dc (see photos). In the next chain space make the other peak. In the next 4 spaces: 3dc, 6dc, 3dc, 6dc. Join with a slst in the top ch of the ch3, do NOT fasten off.
Row 4 :
ch1, sc in each st all around, also sc in the stitches on the right side of the peaks (both loops), in the top of the peaks you make 3sc in the ch sp. At the end, skip the last st which looks very tiny and join with a slst in the ch1.
Info :
size 1A*/1A/2A: fasten off, then skip to section 4.2. size 1B/2B: add 1 extra row of sc, increasing at the top of the peaks (to increase: in the middle st of the peaks, make 3sc). When you're done, join with a slst and fasten off. size 1C: add 2 more rows of sc, increasing at the top of the peaks; when you're done, join with a slst and fasten off.
— Motif variation: longer lantern (4.2) :
Row 3 :
finish row 3 like normal until you reach the ch sp for the 2nd peak. ch9 (instead of ch6). dc in the 4th ch from the hook, dc in the remaining 5 ch, 3dc in the same ch sp. finish the rest of row 3 like normal.
Row 4-6 :
like normal (make the same amount of rows as you did for the normal lanterns).
— Motif variation: shorter lantern (4.3) :
Row 3 :
finish row 3 like normal until you reach the space for the 2nd peak; in that chain space, work: 3dc, ch2, 3dc. finish the rest of row 3 like normal.
Row 4 :
like normal, on the short side you make 2sc in the ch sp.
Row 5-6 :
like normal, but don't increase on the short side (make the same amount of rows as you did for the normal lanterns).
— Motif variation: horizontal half lantern (4.4) :
Row 0 :
start with 1st colour, ch4, join with a slst in the 1st chain to make a loop. in the loop: ch3, dc, ch2, 3dc, ch2, 3dc, ch2, 2dc, fasten off.
Row 2 :
attach 2nd colour to the top ch of the ch3, ch4 (the picture shows ch3 but make sure to ch4), *3dc in the next ch sp, ch2, 3dc in the same ch sp* repeat * 2 more times, ch1, dc in the last st, fasten off.
Row 3 :
attach 3rd colour in the first ch sp, ch3, continue building the half lantern as in the normal sequence for peaks and sides.
Row 4 :
attach 3rd colour to the 1st stitch, ch1, sc in each st across, fasten off. size 1B/2B: add 1 more row of sc (don't forget to increase in the peak). size 1C: add 2 more rows of sc (don't forget to increase in the peak).
— Motif variation: vertical half lanterns (4.5) :
Row 0 :
starting with 1st colour, ch5, join with a slst in the 1st ch to make a loop.
Row 1 :
ch4, 2dc in the loop, *ch2, 2dc in the loop* repeat * 2 more times, ch1, dc in the loop, fasten off.
Row 2 :
attach 2nd colour in the first ch sp, ch3, 2dc in the same ch sp, continue as in the half-lantern sequence creating the arc.
Row 3 :
attach 2nd colour to the first stitch, ch1, sc in each st across, fasten off. size 1B/2B: add 1 more row of sc (no increase). size 1C: add 2 more rows of sc (no increase).
— Joining the lanterns (Section 5) :
Info :
Now we're going to join the lanterns with 'joining rows' in colour A. Use the line drawings when joining the lanterns; the 3 different length options are marked by lines. Start by taking out the lanterns for the first 2 rows and place them in the right order with the right sides up. The instructions below sometimes refer to 'top stitch' or 'centre stitch'. The top stitch is one of the 3 top stitches on each peak; the centre stitch is the stitch halfway the lantern. When joining, you will make an extra sc in the centre stitch, so 2 in total: 1 to join to the 1st lantern and 1 to join to the 2nd lantern.
Joining step 1 :
Start on the right side (except when you're left handed), insert the hook in the 1st st of the half lantern and the 1st st after the top stitches of the other lantern, so you have 4 loops on your hook. Attach yarn here, pull up a loop and ch1.
Joining step 2 :
sc in the next st of both lanterns (both loops), so again 4 loops on your hook, and the next stitches. Make the last sc in the centre st + the last st before the top stitches (if these don't end up opposite each other, even it out by skipping or adding a st somewhere).
Joining step 3 :
make another sc in the centre st + the 1st st after the top stitches of the next lantern. Continue until you reach the next centre st + last st before the top st. Join the next lantern here in the same way (make another sc in that centre st + the first st after the top st of the next lantern). Continue until you reach the end of this row, fasten off.
Info :
The sc tend to lean a little towards you; use your fingers to push them away from you to improve the look. Now take the next lanterns for the next row and join them to this piece by making a new row of sc in the same way. When you've joined all your lanterns, fold the front panel over the back panel (wrong sides together) and join the blue lines (see the drawings), just like you did with the other rows. Repeat on the other side of the top.
— Adding the ribbing (Section 6) :
Info :
In this last section we'll add the ribbing on the waist and the armholes, and the collar. Note: the photos in this section are of the top in size 1A, so if you're making a different size, the photos will not always correspond with the written instructions.
6.1 Making the ribbing for the waistline :
we'll start by making a 'base row' of sc: turn your top so the waistline is facing up, attach yarn to the middle st of the lantern on the right side, ch1. Make a row of sc all around the waistline, also make a sc in the 1st st of each 'joining row'. Join with a slst to the ch1, do NOT fasten off.
6.1 Continue :
Change to a hook that is 0.5 mm smaller (I use 3.5 mm), ch11 (this is to create a rib of 5 cm/2 in; add 2 ch for 1 cm/0.4 in extra or skip 2 ch for 1 cm/0.4 in less). Dc in 3rd ch from the hook. Dc in each remaining ch (if you chained 11, the total is 10 dc; the first 2 ch from the hook that you skip counts as the 1st dc). *Skip 1 st (not the st where the rib starts but the next one), slst in the next 3 stitches.* Repeat from * all the way around (make sure your stitch count stays the same!). Dc in the first dc from the hook (both loops). Dc in the next 8 (if you chained 11) stitches (blo). Dc in the last st (both loops) - make this dc quite loose. Ch2, this counts as the 1st dc for the next row of the rib. Note: make these quite loose to not lose the stretch of the rib! Repeat rows of dc in blo as before, keeping stitch count consistent. Join with a row of slst on the inside (blo) and fasten off.
6.2 Making the ribbing for the armholes :
For size 2A and 2B, we first have to round the armholes before adding the ribbing (for the other sizes, the armholes already have a round shape). Size 2A/2B only: round each corner of the armhole by making: 2sc, 2hdc, 2dc, 1tc, 2dc, 2hdc, 2sc in colour C (you can also use colour A or B). Make sure you make the tc in the centre of the corner. Do this for all corners, so 4 in total.
Armhole ribbing :
Switch to the bigger hook again, start with one armhole and attach your yarn to a st in the middle of the armpit, ch1. Start with a 'base row' of sc all the way around, also in the 1st stitches of the 'joining rows'. At the end, join with a slst to the ch1, switch to the smaller hook again, ch5 (this is for a rib of 2 cm/0.8 in; add 2 ch for 1 cm/0.4 in extra). Make the rib in the same way as the waist (because you ch5 instead of 11, each row will have 4 dc instead of 10), all the way around. You'll end up at the top or the bottom of your rib; join with a row of slip stitches on the inside (blo), fasten off. Repeat for the other armhole.
6.3 Making the collar :
Switch to the bigger hook again, attach yarn to the 1st st of the 'joining row' right from the centre of the neckline on the back, ch1. Sc in each st across (don't forget to sc in the 1st st of the joining rows and the 2 stitches that are joined by this st), join with a slst to the ch1. Turn your work so the neckline is facing towards you, slst to the next corner of the lantern on the left, change to the smaller hook again, ch12 (for a collar of 5 cm/2 in). Continue the ribbing until you reach the middle lantern on the front (if you end at the top of the rib, slst down to the base row). Ch6, slst in the same st to make a loop (you can ch more if your button is bigger), slst to the place where you started with the collar, fasten off. Sew a button on the other side of the collar so you can close the collar like this.
— Finishing :
Info :
Weave in any remaining ends, press lightly if desired, and check all joins for security. Optionally add a bow instead of a button as described in the notes.
This Ada top pattern combines colorful modular lantern motifs into a modern retro vest that is joyful to make and wear. Customize colours and lengths to make a one-of-a-kind piece that sings with personality. Whether you make it for yourself or as a thoughtful handmade gift, this top is sure to brighten any wardrobe. 🧶✨