🧢 Beautiful ✨ Detailed πŸ’ Adorable

60 Macrame Knots & Knot Patterns Pattern

60 Macrame Knots & Knot Patterns Pattern
4.6β˜… Rating
5-7 Hours Time Needed
2.7K Made This
βœ‚οΈ

Beginner Friendly Level

Perfect for those just starting their crochet journey, with clear instructions and simple techniques

⏱️

Weekend Treat

Takes 5-7 hours, making it an enjoyable project to finish over a couple of days.

🏑

Cozy Accent

A warm touch for your space that transforms ordinary corners into inviting nooks filled with handmade charm.

About This 60 Macrame Knots & Knot Patterns Pattern

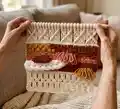
This pattern collection teaches 60 essential macrame knots with clear, photographed steps and concise instructions. Youll learn mounting knots, hitch knots, square knots, braids, and finishing techniques to build wall hangings and accessories. The pattern focuses on practical, repeatable instructions so you can practice and master each knot.

60 Macrame Knots & Knot Patterns Pattern crochet pattern - detailed view of completed project

Step-by-step photo captions and short written steps make this guide easy to follow. Use it as a reference when planning cord lengths and knot sequences for your projects.

Why You'll Love This 60 Macrame Knots & Knot Patterns Pattern

I absolutely love this pattern because it gives me a practical, visual way to learn and practice essential macrame knots. I enjoy how each knot is broken down into simple steps with photos that make the process approachable. The variety of knot types keeps projects interesting and encourages experimentation. I appreciate having a single reference that covers mounting knots, hitch techniques, and decorative finishes for everyday macrame projects.

60 Macrame Knots & Knot Patterns Pattern step 1 - construction progress 60 Macrame Knots & Knot Patterns Pattern step 2 - assembly progress 60 Macrame Knots & Knot Patterns Pattern step 3 - details and accessories 60 Macrame Knots & Knot Patterns Pattern step 4 - final assembly and finishing

Switch Things Up

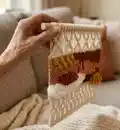
I love how versatile these knots are for customization β€” you can change cord thickness and color to totally alter the look of a pattern.

Want a softer look? Try thinner natural cotton cord and looser tension to create airy, delicate panels.

For a bold, chunky result, switch to thicker cord and larger dowels β€” the knots will read larger and the texture will pop.

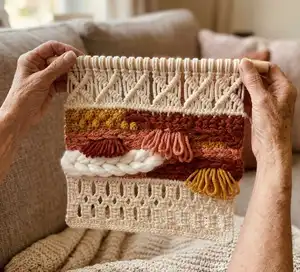
I often add a single colored filler cord row with vertical DHHKs to create a stripe or highlight area of the design.

You can combine knots: use square knot rows interspersed with diagonal DHHKs to craft geometric patterns.

Experiment with different mounts β€” driftwood gives an organic feel while metal rings add modern structure.

Try mirrored knot sequences on both sides of a central column to create balanced, symmetrical hangings.

To create a pocket or loop, use double lark's head swags and secure with wrapping knots at the base.

I sometimes add beads or small rings between rows for a mixed-media effect that catches the eye.

Remember to sample your color placement on scrap cord first β€” it helps avoid surprises when you commit to the full piece.

Common Mistakes & How to Fix Them

βœ— Using cords that are too short for your design; measure and leave extra length before you start to avoid running out mid-project. βœ— Not securing your mounting (dowel or ring) tightly before knotting; clamp or prop your mounting so it does not move while you tie knots. βœ— Pulling knots unevenly which creates asymmetric rows; tighten each knot gently and evenly adjusting as you go to maintain consistent tension. βœ— Skipping practice with basic knots results in sloppy finished work; practice each knot multiple times on scrap cord before using them in a full project.

60 Macrame Knots & Knot Patterns Pattern

This comprehensive macrame knot pattern guide teaches you the essential knots and variations used in macrame projects. Youll learn step-by-step techniques with clear instructions and photo-referenced steps so you can follow along and practice each knot. Perfect as a reference for wall hangings, plant hangers, and decorative pieces, this pattern collection helps you build confidence and skill as you craft. Dive in and enjoy learning foundational and advanced knots to elevate your macrame projects.

Beginner Friendly 5-7 Hours

Materials Needed for 60 Macrame Knots & Knot Patterns Pattern

β€” Main Fabric

  • 01
    Cotton macrame cord 3-6mm natural, multiple lengths depending on project
  • 02
    Accent cotton cord (orange in examples) for color rows, 3-4mm, 20-50g
  • 03
    Wood dowel or driftwood piece for mounting (length as desired)
  • 04
    Option: metal or wooden rings for mounting and decorative loops

β€” Tools Required

  • 01
    Scissors
  • 02
    Measuring tape or ruler
  • 03
    Wood dowel or driftwood for mounting
  • 04
    Optional metal or wooden rings
  • 05
    Small clamp or tape to hold dowel while knotting
  • 06
    Tapestry needle or poking tool to tuck in ends
  • 07
    Comb for fringe finishing (optional)

Progress Tracker

0% Complete

β€” Basic Knots :

Lark's Head Knot (01) :

The lark's head knot is the most common mounting knot you'll use in macrame. You can use it to attach cords to a dowel or a piece of driftwood, metal or wood rings, or another piece of cord. Fold your cord in half, and place the looped in over your dowel (or whatever you're attaching it to). Bring the ends of the cord through the loop and tighten it up to secure.

Cow Hitch Knot (02) :

The cow hitch knot is done the same way as the lark's head knot, but in reverse. Fold your cord in half and place the loop over the dowel; bring the ends of the cord through the loop. Pull the ends to tighten the loop.

Square Knot (03) :

The square knot is one of the most important basic macrame knots you'll learn. The two outside (working) cords will use a lot more cord than the filler cords, so plan accordingly. Cross the left cord across the center cords and behind the right cord. Bring the right cord behind the center cords and pull the end through the loop on the far left. Pull the ends to tighten. This is half of the square knot. Bring the right cord in front of the center cords. Bring the left cord behind the center cords and pull the end through the loop on the far right. Tighten and the square knot is complete.

Half Hitch Knot (04) :

The half hitch knot is another important basic macrame knot. It's half of the even more important double half hitch knot (which we'll learn next). This is how to make a half hitch knot going to the right. To make one going to the left, it's the same, but in reverse. Bring the left cord over the right cord in an L shape. Bring the left cord around the right cord and pull the end through the loop. Tighten it as much as you want for your design.

Double Half Hitch Knot (Clove Hitch) - L to R Horizontal (05) :

The horizontal double half hitch knot can be a little tricky at first, but it's a very important knot to learn. Here's how to make horizontal double half hitch knots from left to right. Hold the left cord in front of the other cords in an L shape. This will be the filler cord. Bring the next cord over up and around the filler cord to make a half hitch knot. Pull the end of the cord to tighten. Repeat that again with the same cord. Tighten up the knot. Repeat across the row with each cord.

Double Half Hitch Knot (Clove Hitch) - R to L Horizontal :

To make double half hitch knots from right to left, it's the same process, just reversed. Follow the same sequence of half hitch knots mirrored to go from right to left.

Double Half Hitch Knot (Clove Hitch) - Diagonal :

Making diagonal double half hitch knots is the same as doing them horizontally, but you hold the filler cord at the angle you want your knots to go. Hold the filler cord at a diagonal angle and tie the first double half hitch knot. Continue tying double half hitch knots, holding the filler cords at an angle to make the diagonal line. It's the same process to go right to left, just reversed. Tie one last knot in the center if you want to connect the sides.

Vertical Double Half Hitch Knot (VDHHK) (06) :

The vertical double half hitch knot is used a lot to add a pop of color to macrame wall hangings. Here's how to tie a row of vertical double half hitch knots to the right. Hold the short end of a piece of cord behind and to the left of the first two filler cords. The right side of this cord is much longer. Bring the right end of the cord in front of and then around the filler cords. Tighten up the cord. Hold the right side of the cord with your finger and cross the right end of the cord in front of the filler cords. Wrap the end around and bring it through that loop you're holding.

Vertical Double Half Hitch Knot - Continued :

Here's how to continue tying a row of vertical double half hitch knots to the left. Cross the working cord behind the filler cord and hold the loop. Then bring the end around in front and through the loop. Tighten up the knot. Pull the working cord around to the left. Cross the end of the working cord in front of the filler cords, holding the loop. Bring the ends through the loop and tighten. Continue across the row. Two rows complete!

Vertical Lark's Head Knot (VLHK) (07) :

The vertical lark's head knot is a handy knot to know. The top row shows how to make a right facing vertical lark's head knot, and the bottom row shows how to make a left facing vertical lark's head knot. Cross the right cord in front of the left cord in the shape of a backwards L. Bring the end around and through the loop. Bring that same cord behind the other cord from left to right. Wrap the end around and pull it through the loop. Tighten up the knot.

Overhand Knot (08) :

The overhand knot is one of the most basic knots there is. It's super useful for macrame and just about anything that involves a knot. Make a simple loop and bring the end through the loop, then pull tight to secure. Use it as a stopper knot or to secure ends.

Wrapping Knot (09) :

The wrapping knot is commonly used to finish plant hangers or anything that needs to be gathered and secured. It's a very handy knot to know and use. Hold a piece of cord in front of the cords you want to wrap. Hold it in a U shape, with the short side on the left. Start wrapping with the long end, making sure the short left side is sticking out of the top. Continue wrapping until it's the length you want. Make sure you don't go past the loop at the bottom. Bring the end you've been wrapping with through the loop. Pull the short cord at the top to pull the loop halfway up the wrapped section. The two ends will be sticking out of the top and bottom. Cut them close to the wraps. Use the end of your scissors to poke the ends up under the wraps if needed.

β€” Lark's Head Knot Alternatives & Variations :

Extended Lark's Head Knot (10) :

The extended lark's head knot is a good way to add some extra space between your cords. After you attach the cord to your dowel with a lark's head knot, take the right cord and bring it behind and over the dowel. Bring the end of the cord down through the loop and tighten. Do the same thing on the left side to create the extended effect.

Double Lark's Head Knot (11) :

If you want to attach a piece of cord to your dowel on both ends, leaving a loop of cord in the middle, this is how to do it. This is a great way to add extra fringe to your wall hangings, just attach each piece of fringe to the swag of cord using lark's head knots. After attaching the cord to the dowel, take the right side and hold it in front of the dowel. Bring the end around and through the loop and tighten it up.

Crossed Lark's Head (Version 1) (12) :

This is a fun way to jazz up your lark's head knot a little bit. It still functions the same way as a regular lark's head, but it adds a little more detail and texture. Attach your cord with a lark's head knot, but pull out the loop a bit. Twist the loop 180 degrees clockwise, so it twists. Pull the loop up and over the dowel. Pull the ends through the loop and tighten it up.

β€” Square Knot Patterns & Variations :

Square Knot Patterns Overview (section note) :

The square knot is central to many macrame patterns. Use combinations of left-facing and right-facing square knots to create rows, alternating textures, and decorative panels. The two outside cords will be the working cords while the center cords remain filler cords for multiple knots in a row.

β€” Vertical Lark's Head Knot Patterns & Variations :

Vertical Lark's Head Pattern Note :

Vertical lark's head knots can be combined to form vertical columns, added color pops, and decorative details. Use them to create stacked motifs or as connectors between horizontal patterns.

Assembly Instructions

  • Attach cords to your dowel using lark's head or cow hitch knots, spacing cords evenly and leaving extra length for fringe and knotting.
  • Use square knots to create the main body of your panel, arranging filler cords and working cords so the design reads evenly across the width.
  • Add diagonal or vertical double half hitch rows to introduce angled lines or colored stripes; secure the filler cord tension as you go.
  • Finish groups of cords with a wrapping knot to gather and secure ends, then trim or tuck ends with a poking tool for a neat finish.

Important Notes

  • πŸ’‘Measure and cut more cord than you think youll needβ€”macrame uses a lot of extra length for knots and fringe.
  • πŸ’‘Work with consistent tension to keep rows even and patterns neat; practice tension on scrap cords first.
  • πŸ’‘Secure your mounting (dowel or ring) well so it doesnt move while you tie knots; use tape or a clamp if needed.
  • πŸ’‘Comb and trim fringe only after completing knotting and securing any finishing wraps for a clean edge.

This collection of 60 macrame knots is a practical, beautifully photographed guide to help you master mounting, hitch, square, and decorative knots. Use it as a reference while you plan wall hangings, plant hangers, or woven accessoriesβ€”each knot is shown step-by-step with clear captions to guide you. Keep this guide at your craft table and enjoy building textured, handmade pieces for your home and as gifts. 🧢✨

You ask,

we answer.

FAQs

What material and cord size should I use?

Natural cotton macrame cord 3-6mm is an excellent all-purpose choice; thinner cord for delicate work and thicker cord for bold, chunky wall hangings.

How much cord will I need for a typical wall hanging?

Cord requirements vary widely depending on design and knot density; as a rule of thumb, plan for 3-6 times the finished hanging length per cord and allow extra for fringe and detailing.

Can beginners learn from this pattern booklet?

Yes, this collection is beginner friendly with step-by-step photo captions and simple instructions to practice foundational knots before attempting larger projects.

How do I finish the ends of my macrame project neatly?

Use wrapping knots to gather ends, tuck raw ends under wraps with a poking tool, or trim and comb fringe for a polished look.